Overview
When creating an inventory adjustment, you can now enter the actual counted (or new) quantity for a location instead of calculating the adjustment amount yourself. Luminous automatically calculates the +/- adjustment for you based on the difference between the current quantity and what you enter. Use this when doing a physical or cycle count and you just want to key in what you counted.
How It Works (Step-by-Step)
-
From the left navigation pane, click Inventory.
-
Select Stocks (or open a specific SKU from the Stocks Grid).
-
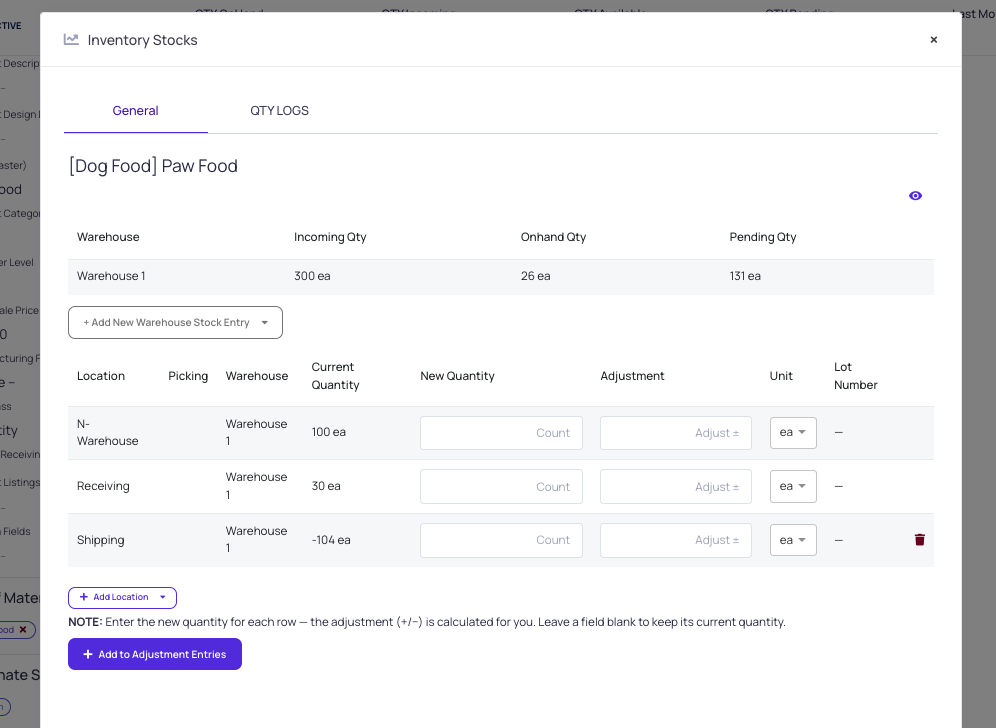
Open the SKU you want to adjust and click Create Adjustment Entry from action menu(three dots)— this opens the Inventory Stocks panel.
-
In the location/warehouse table, find the row(s) you need to adjust.
-
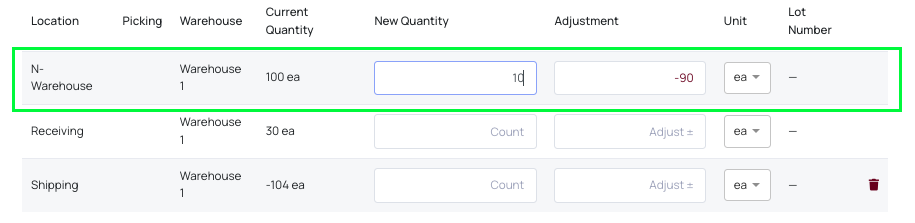
In the New Quantity field, type in the actual quantity you counted for that location.
-
Luminous will automatically calculate and display the Adjustment (+/-) next to it — you don't need to do this math yourself.
-
Leave the field blank for any row where the quantity hasn't changed; it will keep its current quantity.
-
Click + Add to Adjustment Entries to move your changes into the SKU Adjustment Entries table below.
-
Repeat for additional locations/warehouses as needed.
-
(Optional) Add a note in the Remarks field to record the reason for the adjustment (e.g., "cycle count," "miscount correction").
-
Click Post Adjustment Entries to finalize. Luminous updates on-hand inventory immediately and logs the entry to adjustment history.
Key Features / Options
| Field | What it does |
|---|---|
| Counted Quantity / New Quantity | Enter the actual quantity on hand — this replaces the need to calculate a delta manually. |
| Adjustment | Auto-calculated (+/-) based on the difference between Current Quantity and what you entered. Read-only. |
| Blank field | Leaving a row's Counted Quantity blank keeps that location's quantity unchanged — it will not zero it out. |
| Lot Number | Still applies per-row if lot tracking is enabled; the counted quantity is tied to that lot at that location. |
Tips or Best Practices
- Double-check you're entering the counted quantity, not the adjustment amount — entering "50" no longer means "add 50," it means "the actual count is 50."
- Use the Remarks field every time — since the raw math is now hidden from the user, a note on why the count changed (miscount, spoilage, cycle count, etc.) is more important for later audits.
- If a location's quantity truly hasn't changed, leave its field blank rather than re-typing the current number — this avoids accidental logging of a zero-adjustment entry.
- Review the auto-calculated Adjustment value before posting — it's a good sanity check to confirm you typed the count into the right row.
FAQs / Troubleshooting
Q: I typed in a number and the Adjustment field shows a value I didn't expect. What happened?
A: The Adjustment is calculated as (Counted Quantity − Current Quantity). If the Adjustment looks off, check that you selected the correct row/location — it's easy to mix up rows when a SKU has several locations.
Q: Do I still need to type a negative sign for quantity decreases?
A: No — you only enter the actual counted number. If that number is lower than the current on-hand, Luminous will show a negative adjustment automatically.
Q: What if I leave the field blank by mistake?
A: A blank field is treated as "no change" — that location's quantity stays the same. It will not be set to 0.
Q: Is this available on both the SKU-level and Location-level adjustment flows?
A: Based on the screenshots reviewed, this is confirmed on the SKU-level (Stocks) adjustment panel. Confirm with engineering whether the Location-level and Sales Order–based adjustment flows use the same Counted Quantity behavior before publishing broadly.
Additional Help
If you run into unexpected adjustment values or need help correcting a posted entry, contact Luminous Support through the in-app chat or your account representative.