Overview
Force Push to Source lets you manually push shipment tracking information to your sales channel (e.g., Shopify) for specific order lines at any time — even when the automatic tracking sync didn't fire, or when SKUs in the shipment don't match the original order. Use it as a targeted override when the standard push fails or needs correction.
When to Use This
Use Force Push to Source when:
- Tracking was not automatically sent to Shopify (or another sales channel) after a shipment was created
- Shipment SKUs don't match the original order SKUs — e.g., a 3PL shipped individual kit components instead of the bundle SKU
- A mapping misconfiguration caused the original tracking push to fail silently
- You need to resend or correct tracking that was previously pushed with the wrong tracking number or carrier
- You want to push tracking for specific order lines only, rather than the entire order
💡 Force Push vs. Standard Push: The standard Push Tracking to Sales Channel action uses the normal automatic method and includes SKU-matching validation. Force Push to Source bypasses that validation entirely — use it only after you've confirmed the shipment details are correct.
🔗 Also available via API, MCP, and CLI — this feature can be automated for teams that need to trigger tracking pushes programmatically or at scale.
How to Access Force Push to Source
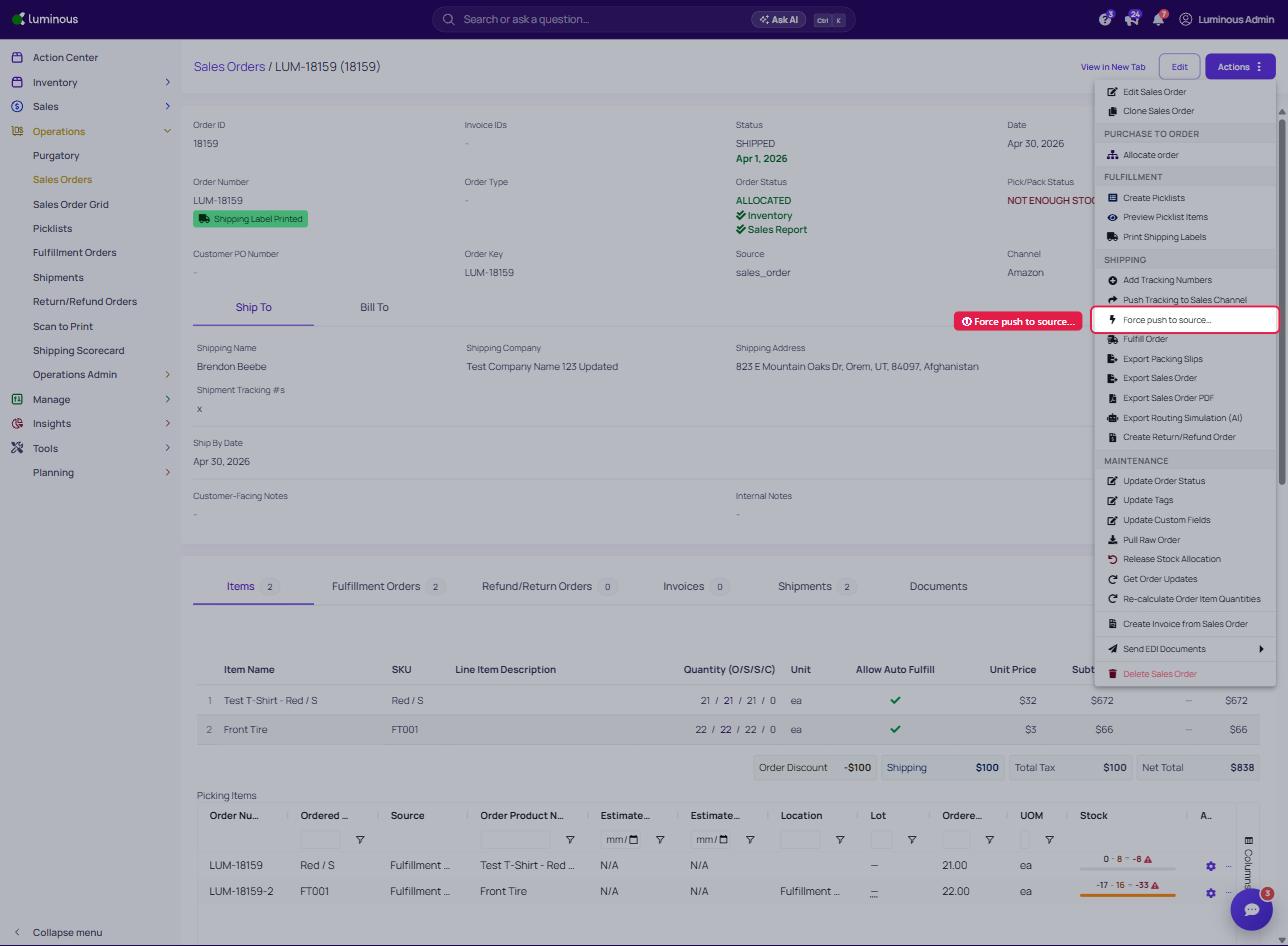
- Navigate to Operations → Sales Orders (or locate the order from the Sales Orders grid).
- Open the relevant Sales Order.
- Click the actions menu (three-dot or dropdown) in the top-right area of the order.
- Under the Shipping section of the menu, you'll see two options:
- Push Tracking to Sales Channel — standard push
- Force push to source… — manual override push
- Click Force push to source… to open the modal.
Using the Force Push to Source Modal
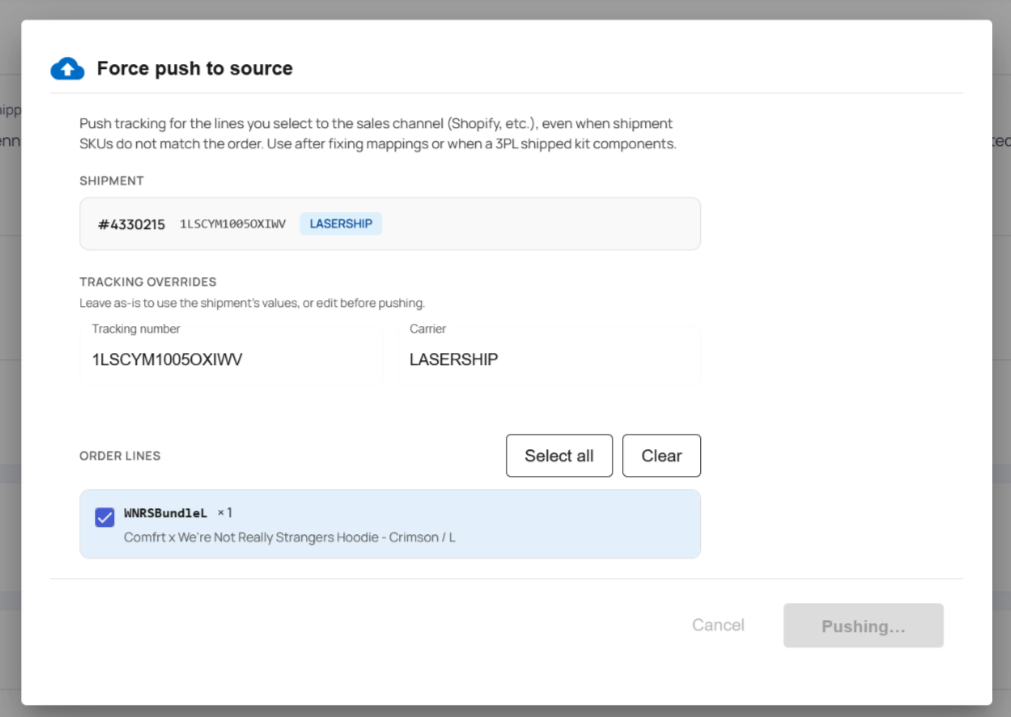
Once the modal opens, you'll work through three sections:
1. Shipment The Shipment field automatically displays the shipment associated with the order, showing the shipment number, tracking number, and carrier. Verify this is the correct shipment before continuing.
2. Tracking Overrides This section shows the current tracking number and carrier pulled from the shipment record.
- Leave both fields as-is to push the existing tracking values to the sales channel.
- Edit either field if you need to correct or override the tracking number or carrier before pushing.
3. Order Lines All line items on the order are listed here with checkboxes.
- Check the boxes next to the lines you want to push tracking for.
- Use Select All to select every line at once.
- Use Clear to deselect all.
⚠ Only checked lines will have tracking pushed. If a line item was already fulfilled correctly in Shopify, leave it unchecked to avoid sending a duplicate fulfillment notification.
4. Confirm Once you've reviewed the shipment, confirmed or updated the tracking overrides, and selected the correct order lines, click Pushing… to send the tracking to your sales channel. The customer will receive their shipment notification with the tracking number.
Tips & Best Practices
- Always verify the shipment first. Confirm the shipment number, tracking number, and carrier shown in the modal match what was actually shipped before you push.
- Use tracking overrides sparingly. Only edit the tracking number or carrier if you know the shipment record is incorrect. Overriding with a wrong value will push bad tracking to the customer.
- Don't push already-fulfilled lines. If certain lines already show as fulfilled in Shopify, leave them unchecked. Pushing tracking to a line that's already fulfilled can create duplicate notifications or fulfillment errors on the Shopify side.
- Check your mapping first if this keeps happening. Repeated failures to auto-push tracking often point to a SKU mapping misconfiguration. Fix the root cause in your channel settings so you don't have to manually force push every order going forward.
- For 3PL kit scenarios: If a 3PL ships kit components under individual SKUs instead of the bundle SKU, Force Push is the correct recovery tool — it bypasses the SKU-match check that would otherwise block the push.
FAQs & Troubleshooting
Q: The modal opened but I don't see any order lines listed. This can happen if the order has no line items associated with the shipment, or if the order data didn't load correctly. Refresh the page and try reopening the modal. If the issue persists, contact Luminous Support with the Sales Order number.
Q: I pushed tracking but the customer still didn't get a notification. Shopify sends the shipment notification email on its end after Luminous pushes the fulfillment. Check the order in Shopify to confirm fulfillment was received. If the order shows as unfulfilled in Shopify, check your Shopify channel settings and confirm the connection is active.
Q: Should I use Force Push or the standard Push Tracking to Sales Channel? Start with the standard push. Only escalate to Force Push when the standard push fails — typically due to a SKU mismatch or a prior mapping issue.
Q: Can I push tracking for just one line on a multi-line order? Yes. That's one of the primary use cases for this feature. Use the checkboxes in the Order Lines section to select only the specific lines you want to push.
Q: The Pushing… button appears greyed out. What's wrong? Make sure at least one order line is checked. The confirm button won't activate until at least one line is selected.
Q: Can I automate this for bulk orders? Yes — Force Push to Source is available via the Luminous API, MCP, and CLI, so you can automate it for high-volume scenarios or recurring workflows.
Related Articles to Review
Before using Force Push, it's worth checking the following existing docs — some describe workflows that this feature directly affects or recovers from:
- SOP: Fulfillment Workflow (Shopify → Luminous → ShipStation) — describes the standard automatic tracking sync back to Shopify (Step 5D). Force Push is the manual fallback when that auto-sync fails.
- Managing Shipments Manually in Luminous — covers manual shipment creation. If you created a manual shipment (vs. an OMS shipment), you may need Force Push to send its tracking upstream since manual shipments don't trigger the standard auto-push.
- Troubleshooting Fulfillment Orders with "Action Required" Status — mapping misconfigurations that cause "Action Required" errors are the same root cause that can block a standard tracking push. Fix the mapping first, then use Force Push to send the corrected tracking.
Additional Help
If tracking still isn't reaching your sales channel after using Force Push, or if you're seeing unexpected behavior in the modal, contact the Luminous Support team and include:
- Your Sales Order number
- The shipment number shown in the modal
- Your sales channel name (e.g., Shopify store)
- A screenshot of the modal or any error message displayed