Overview
If you regularly receive large volumes of purchase orders — whether from seasonal restocking, multiple suppliers, or initial data setup — manually creating each PO one at a time isn't practical. Luminous supports bulk importing of purchase orders via a structured spreadsheet template, allowing you to create many POs at once in a single upload.
When to Use This
Use bulk PO import when you need to:
- Create multiple POs across different suppliers at once
- Migrate historical purchase order data into Luminous
- Set up a large restocking run without manual entry
- Reduce time spent on repetitive PO creation during onboarding
💡 Note: If you only need to bulk-enter or adjust line item quantities within a single existing PO shipment, see Import and Export Line Items When Creating a Shipment for a Purchase Order instead.
Before You Start
Make sure the following are already set up in Luminous before importing:
- Suppliers — all supplier names in your import file must exactly match existing suppliers in Luminous. To add a supplier, see How to Create a New Supplier.
- SKUs — all variant or master SKUs referenced in the import must already exist. See SKUs in Luminous.
- Warehouse/Receiving Locations — the destination warehouse must be configured. See How to Create and Manage Warehouses and Warehouse Groups in Luminous.
How It Works (Step-by-Step)
- From the left navigation menu, go to Tools > Imports, then under Procurement click Purchase Orders.
- On the Import page, click Download Purchase Orders Template to get the official CSV file. Always use this template — do not create your own from scratch.
- Open the template and fill in your purchase order data. Each row represents one line item on a purchase order. To create a PO with multiple line items, use multiple rows with the same PO number.
- The following fields are required on every row:
- ALTERNATE_PO_ID - Alternate Purchase Order ID. Multiple rows with the same ALTERNATE_PO_ID will be grouped into one purchase order. This is used to match existing purchase orders or create new ones.
- SUPPLIER_NAME - Supplier name. If no existing supplier matches, a new supplier will be created.
- Order Date — Order date. Format: YYYY-MM-DD or DD-MMM-YYYY (e.g., 2024-12-12 or 12-Dec-2024).
- MASTER_SKU — Master SKU. Must match an existing SKU in the system.
- Quantity — Quantity for this line item.
- UNIT_COST - Unit cost for this line item.
- The following fields are optional but supported:
- Warehouse or Location
- Arrival Due Date and Requested Ship Date
- Shipping Cost and Tax
- Public Note and Private Note
- Tags
- Custom Fields (use the exact label as configured in your account)
- Save the completed file as a .csv format.
- Back on the Tools > Imports > Purchase Orders page, click Choose File and select your CSV then click Next.
- Luminous will validate the file and show a preview of records to be imported. Review any flagged rows before proceeding.
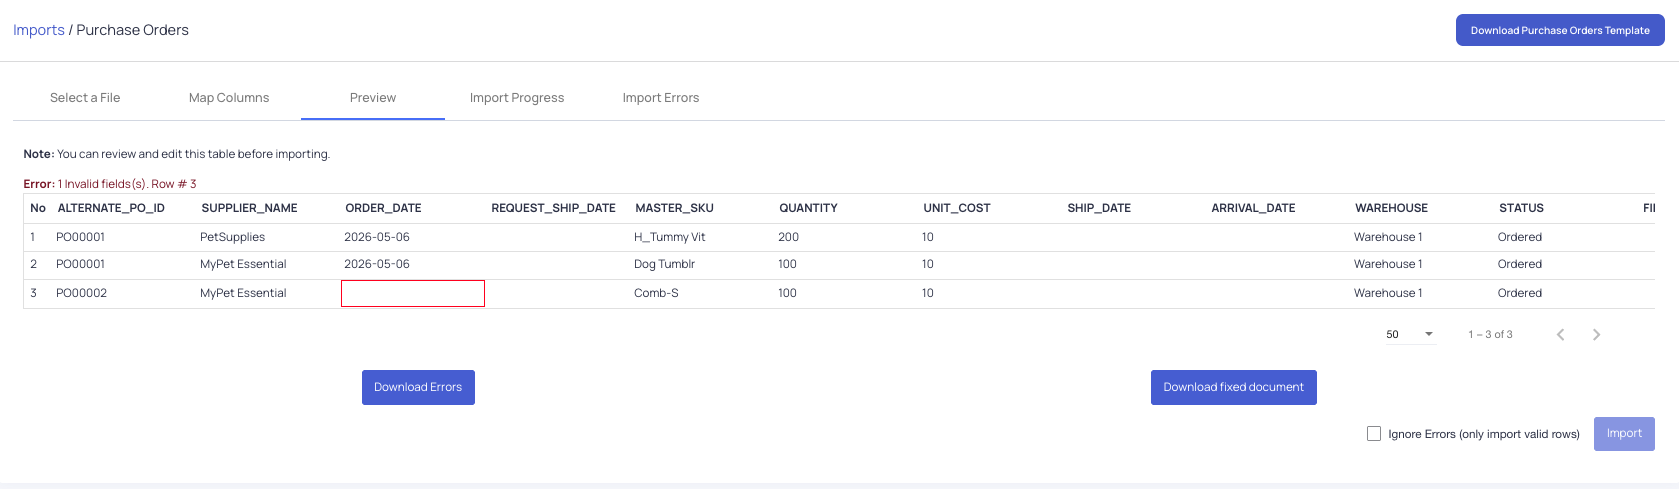
- Optional: You can ignore Errors and import only the valid rows.
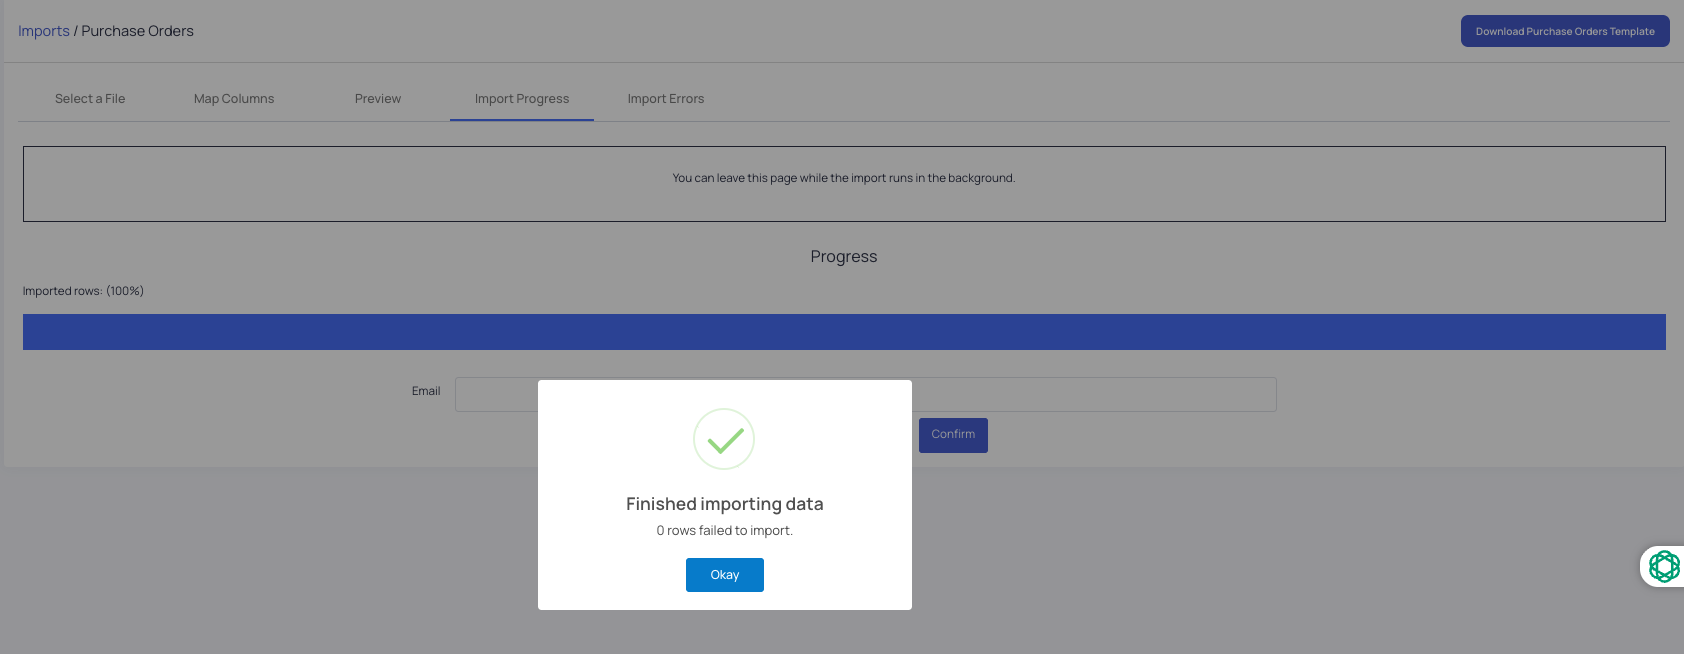
- Click Import to complete the process. You'll see a confirmation showing if there are failed row imports.
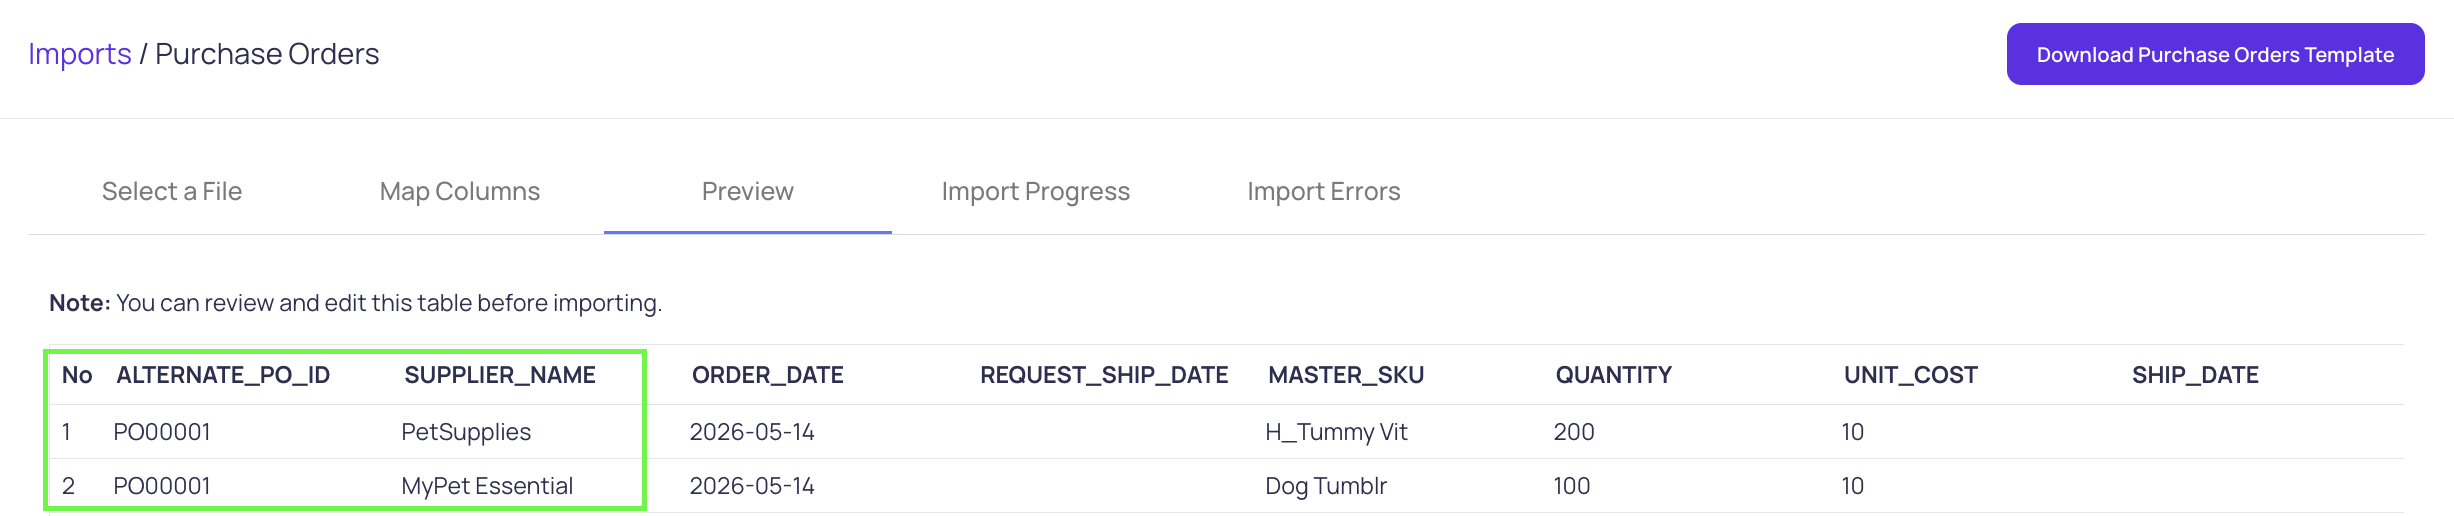
- To validate your Bulk Import, go to Inventory > Purchase Orders and you will be able to see Bulk Purchase orders created.
- If you have the same ALTERNATE_PO_ID for different Suppliers, Luminous will create a separate PO(with their own unique ID) for each suppliers.

Key Features / Options
SKU vs. Product ID — You can identify products by SKU (including alternate SKUs) or by their internal Luminous Product ID. If both are included in a row, Product ID takes priority.
Multi-line item POs — One row = one line item. To group multiple line items under a single PO, use the same PO Number across those rows.
Order Status — Defaults to active if left blank. You can also set completed for importing historical PO records.
Custom Fields — Column headers for custom fields must exactly match the label as configured in your Luminous account, including capitalization.
Tips and Best Practices
- Always use the downloaded template — Column order and headers must match exactly for the import to process correctly.
- Use YYYY-MM-DD for all dates — Any other date format will trigger a validation error.
- Prefer SKU over product name — SKUs are unique identifiers. Product names can have duplicates or variations.
- Test with a small batch first — Import 5–10 rows before running your full file to confirm formatting is correct.
- Check for duplicate PO numbers — Importing a PO number that already exists in Luminous may create a duplicate. Review your existing POs beforehand.
- Leave calculated fields blank — Order Cost, Total Cost, and Total Due are calculated automatically by Luminous. Do not fill these in.
FAQs and Troubleshooting
Why am I seeing validation errors after uploading? The most common causes are a missing required field (Order Date, Supplier, SKU/Product ID, Quantity, or Unit Price), an incorrect date format, or a supplier name that doesn't exactly match what's in Luminous.
My SKU isn't being recognized — what should I do? Confirm the SKU exists in your product catalog under Products. SKU matching is case-sensitive. Alternate SKUs are supported. If the product doesn't exist yet, create it first before re-running the import.
Can one import file include POs for multiple suppliers? Yes. Each row can reference a different supplier. Luminous will create separate purchase orders per supplier, grouped by PO number.
Will the import update my inventory counts? Yes. Incoming quantities from imported POs are automatically reflected in your "On Order" stock counts immediately after a successful import.
Can I undo a bulk import? There is no bulk undo option. If records were created incorrectly, you will need to delete the affected purchase orders individually. For large corrections, contact support.
Some rows were skipped — why? Rows with validation errors are skipped during import. Check the import results summary for a list of skipped rows and the reason each one failed.
Additional Help
If your import continues to fail after troubleshooting, contact the Luminous support team at support@joinluminous.com or use the in-app chat. Include your CSV file (remove sensitive data if needed) and a screenshot of any error messages for faster resolution.