Overview
The Freightview integration connects Luminous directly to Freightview so freight shipments can be quoted, booked, documented, and tracked without leaving the Luminous platform. This is designed for LTL freight shipping, which is commonly used for palletized, oversized, or heavy shipments that do not move through parcel carriers like UPS or FedEx.
Before this integration, teams had to move back and forth between Luminous and any Transport Management System(TMS), manually entering shipment information, comparing rates, booking freight, and then returning to Luminous to update records. The integration removes that extra work by bringing the freight workflow directly into the fulfillment process.
This matters because it reduces manual entry, lowers the risk of shipping errors, centralizes tracking, and keeps shipping documents tied to the correct order. It also gives warehouse and customer support teams one place to manage both parcel and freight shipments.
Why the Freightview Integration Is Important
Freight shipping usually involves more complexity than standard parcel shipping. Teams often need to compare multiple carriers, account for pallet counts, manage pickup schedules, and handle documents like Bills of Lading and Proof of Delivery. Without an integration, this process is time-consuming and easy to mismanage.
The Freightview integration improves this process in several important ways:
- Reduces double entry by reusing order, address, and package data already stored in Luminous
- Lets users compare carrier quotes in one place
- Supports booking directly from the fulfillment workflow
- Automatically brings shipment details and documents back into Luminous
- Syncs shipment status updates so teams can track freight progress inside the order record
- Creates a more consistent experience for warehouse staff, shipping managers, admins, and support teams
For teams shipping flooring, palletized inventory, or other heavy goods, this integration can significantly streamline daily shipping operations.
What the Freightview Integration Does
Once connected, Freightview adds freight functionality directly into Luminous. Users can:
- Connect a Freightview account to Luminous using API credentials
- Assign that Freightview connection to a fulfillment channel
- Build freight shipments from the package builder
- Get live freight quotes from supported LTL carriers
- Compare rates, service levels, transit times, and appointment requirements
- Book the selected shipment
- Automatically retrieve documents such as BOL, labels, and POD
- Sync status updates from Freightview back into Luminous
- View freight shipment details from the order’s shipment section
Freightview is currently the first supported freight provider in Luminous, but the workflow was built so additional freight providers can be added later without changing the setup pattern.
Before Getting Started
Before setting up Freightview in Luminous, make sure the following requirements are met:
- Have a Freightview account with a valid Client ID and Client Secret
- The Freightview integration feature flag is enabled
- Warehouse groups have complete origin addresses
- Fulfillment orders have complete ship-to addresses
- Products include accurate weights and dimensions for proper quoting
If any of these details are missing, quoting may fail or return incomplete results.
How to Connect Freightview to Luminous
Step 1: Create the Freightview integration account
-
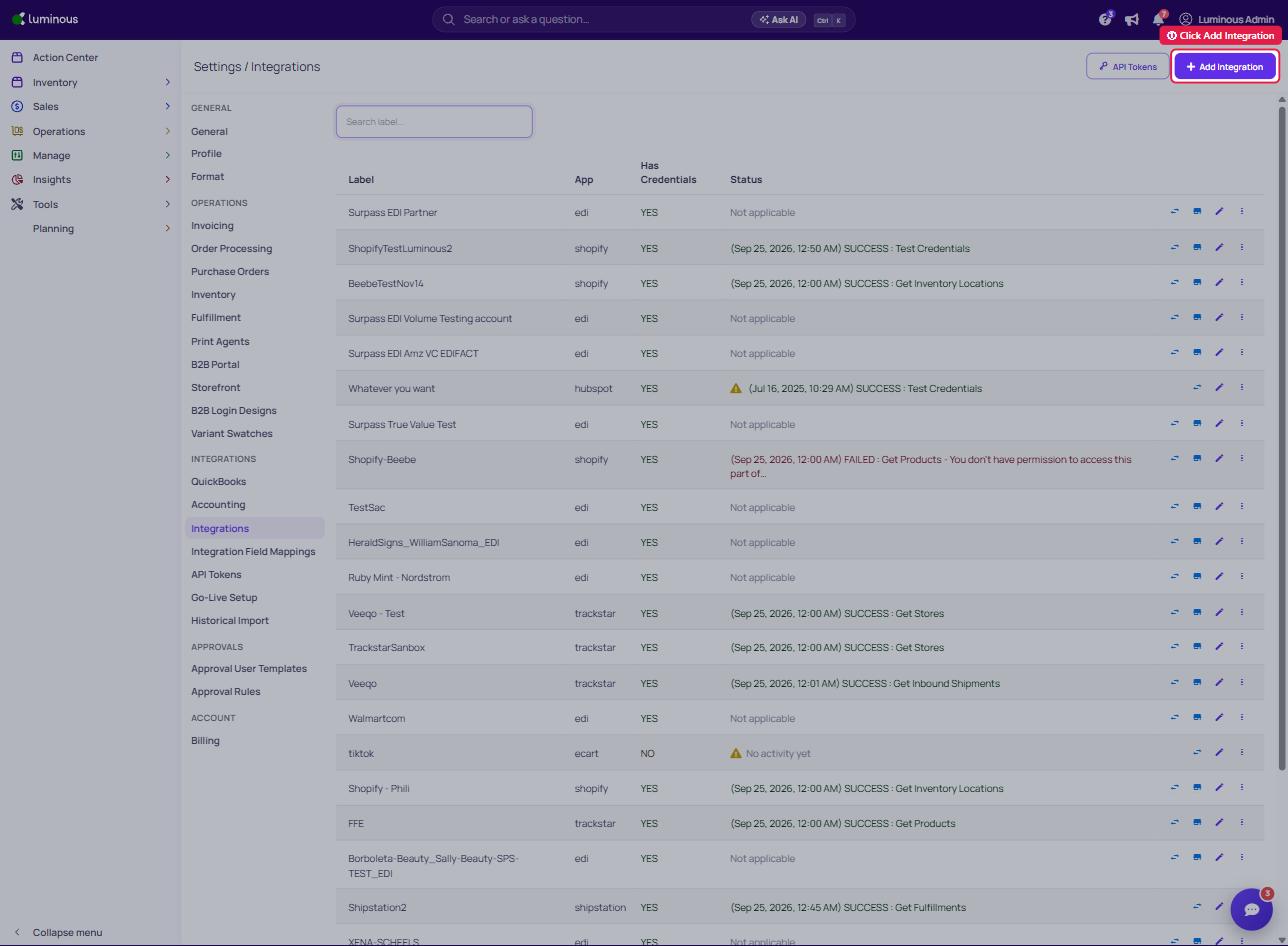
In Luminous, go to Settings > Integrations (App Integration Accounts)
-
Click + Add Integration to create new integration
-
Select the FreightView tile from the integrations catalog
-
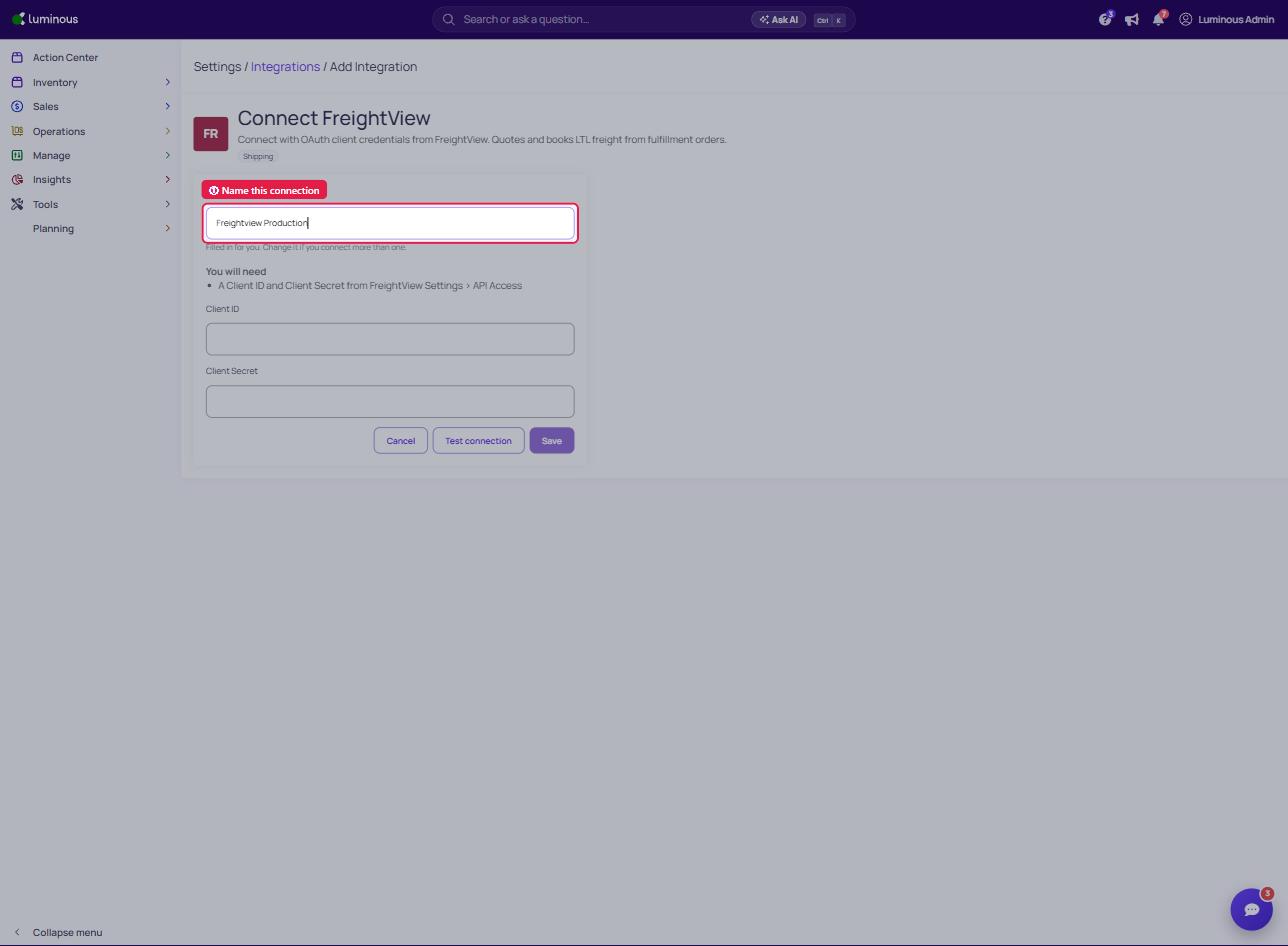
Under Name this connection, enter a clear label, such as Freightview Production
-
Enter the Client ID and Client Secret provided by Freightview
-
Click Save (use Test connection to check the credentials first)
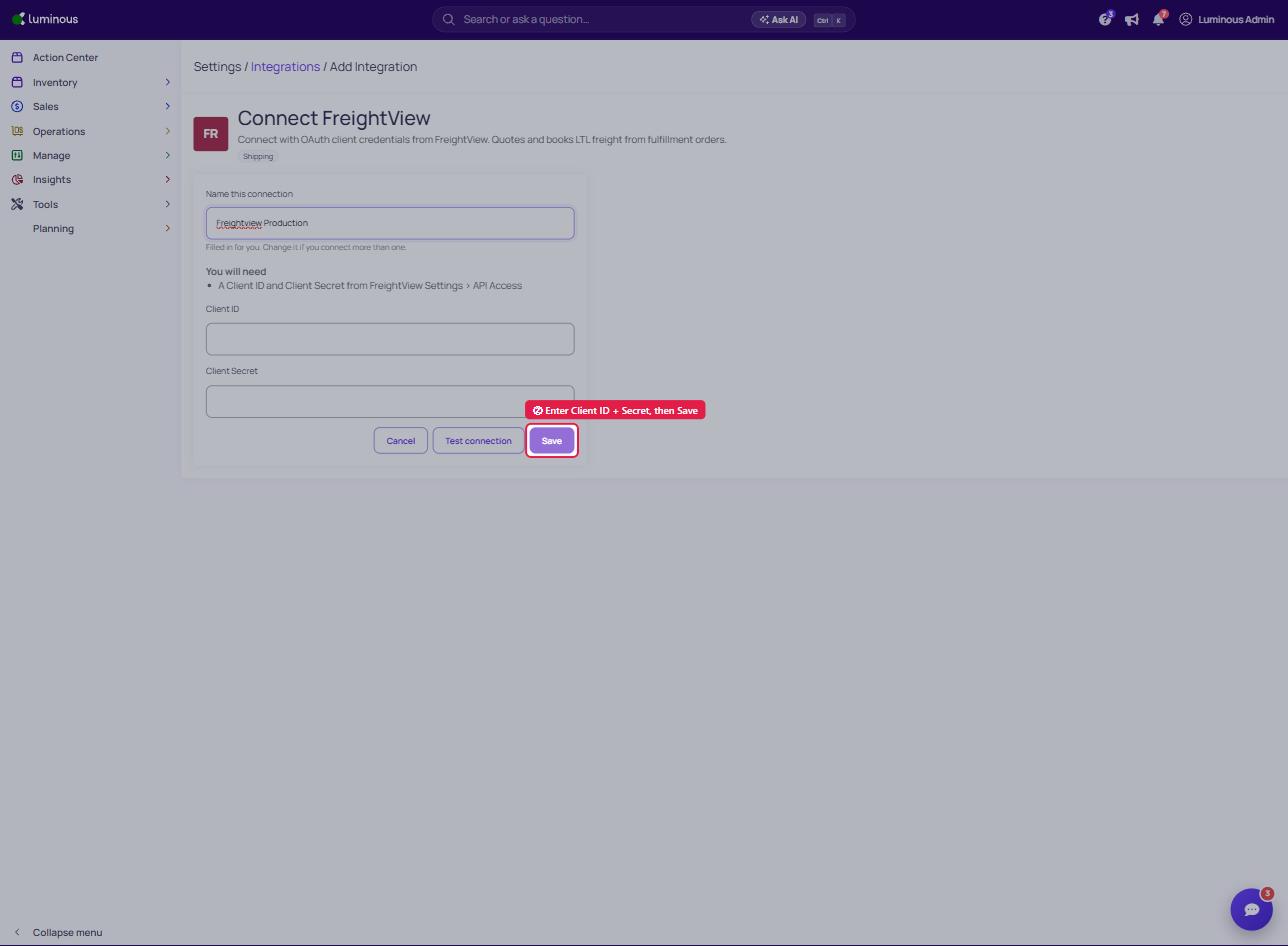
After a successful connection, Luminous stores the credentials securely and manages authentication tokens automatically. This includes refreshing tokens in the background when needed, so users do not have to reconnect repeatedly during normal use.
Step 2: Link Freightview to a fulfillment channel
- Go to Manage > Channels
- Open the channel that should use Freightview.
- Note: It should be a Fulfilment Channel
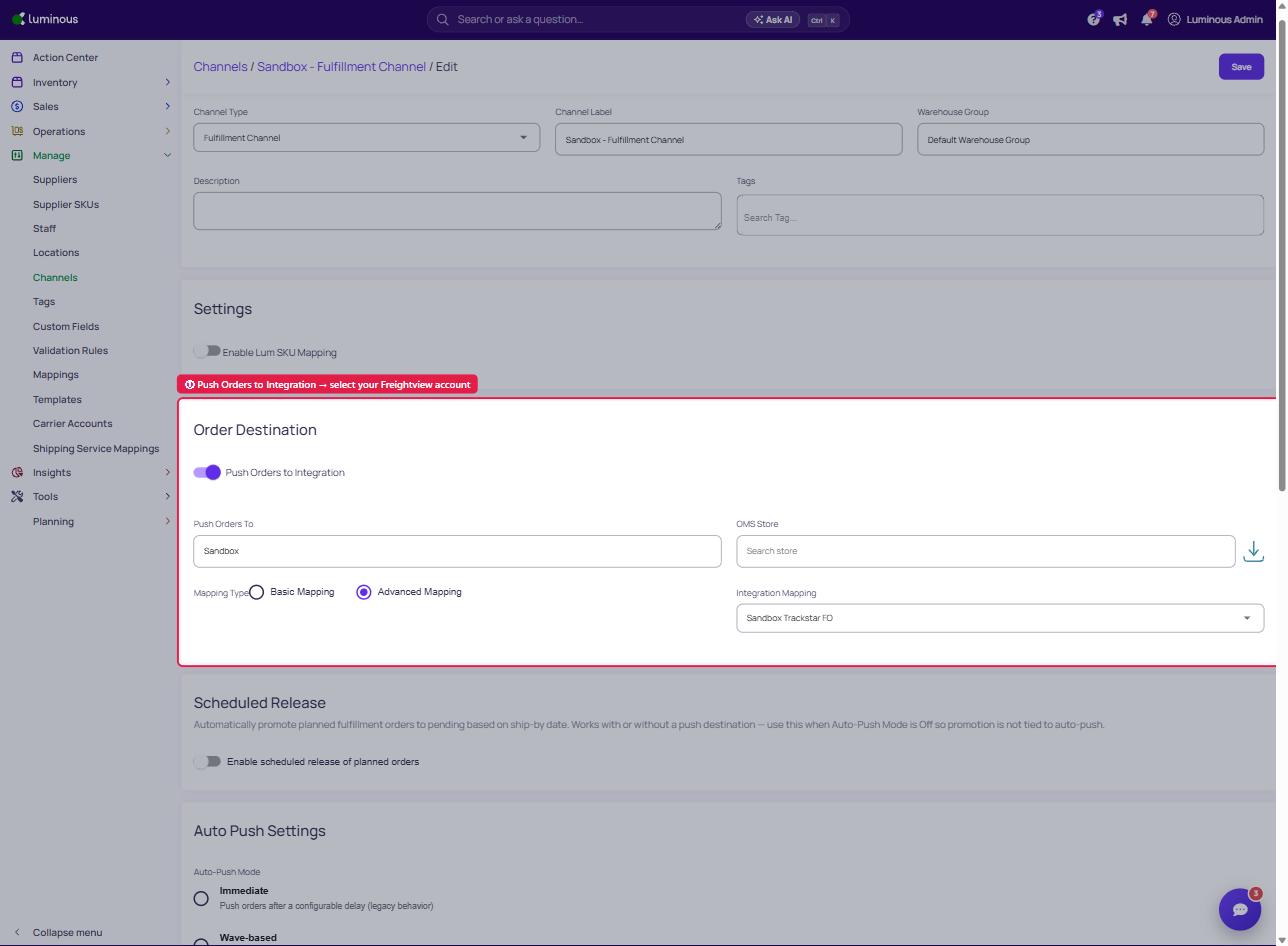
- In the Order Destination settings
-
Toggle the Push Orders to Integration switch
-
Select the connected Freightview account
-
- Save the channel configuration
Once this is saved, fulfillment orders on that channel can use Freightview for freight shipping.
Step 3: Configure Freight Defaults (Optional)
The Freight Defaults tab pre-fills the LTL freight booking form with your standard location types and delivery accessorials. This saves time during shipment booking — operators can still override any value per individual shipment.
- From Settings > Integrations, locate your FreightView account and click to open it.
- Click the Freight Defaults tab (third tab, after Warehouse Mapping and Field Mappings).
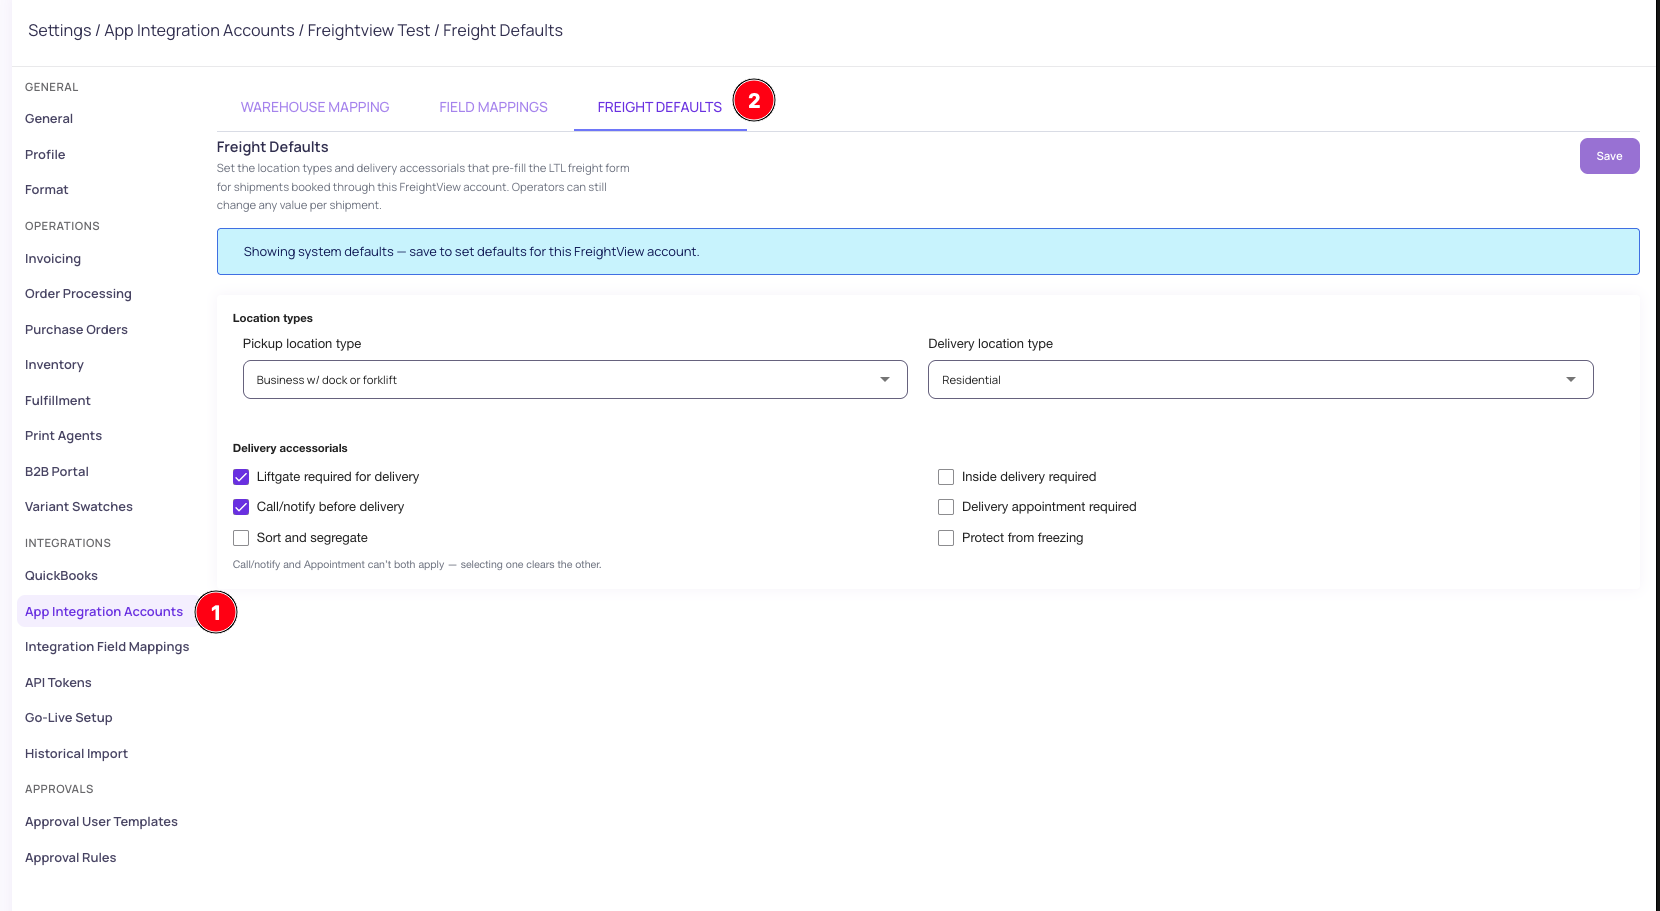
- Note the banner: "Showing system defaults — save to set defaults for this FreightView account." This appears until you save account-level defaults.
- Under Location Types, set your:
- Pickup location type — the facility type freight ships from (e.g., Business w/ dock or forklift)
- Delivery location type — the facility type at the destination (e.g., Residential)
Under Delivery Accessorials, check any services that should apply by default:
| Accessorial | Notes |
|---|---|
| Liftgate required for delivery | Required when delivery location has no dock or forklift |
| Call/notify before delivery | Carrier contacts recipient before delivery |
| Sort and segregate | Freight organized/separated at delivery |
| Inside delivery required | Delivery inside the building, not curbside |
| Delivery appointment required | Scheduled delivery window required |
| Protect from freezing | Temperature protection during transit |
⚠ Call/notify before delivery and Delivery appointment required are mutually exclusive — selecting one clears the other.
- Click Save.
These defaults pre-fill the Freight Options section of the Package Builder. They do not lock any values — operators can adjust per shipment at booking time.
How to Create a Freight Shipment and Request Quotes
Open the package builder
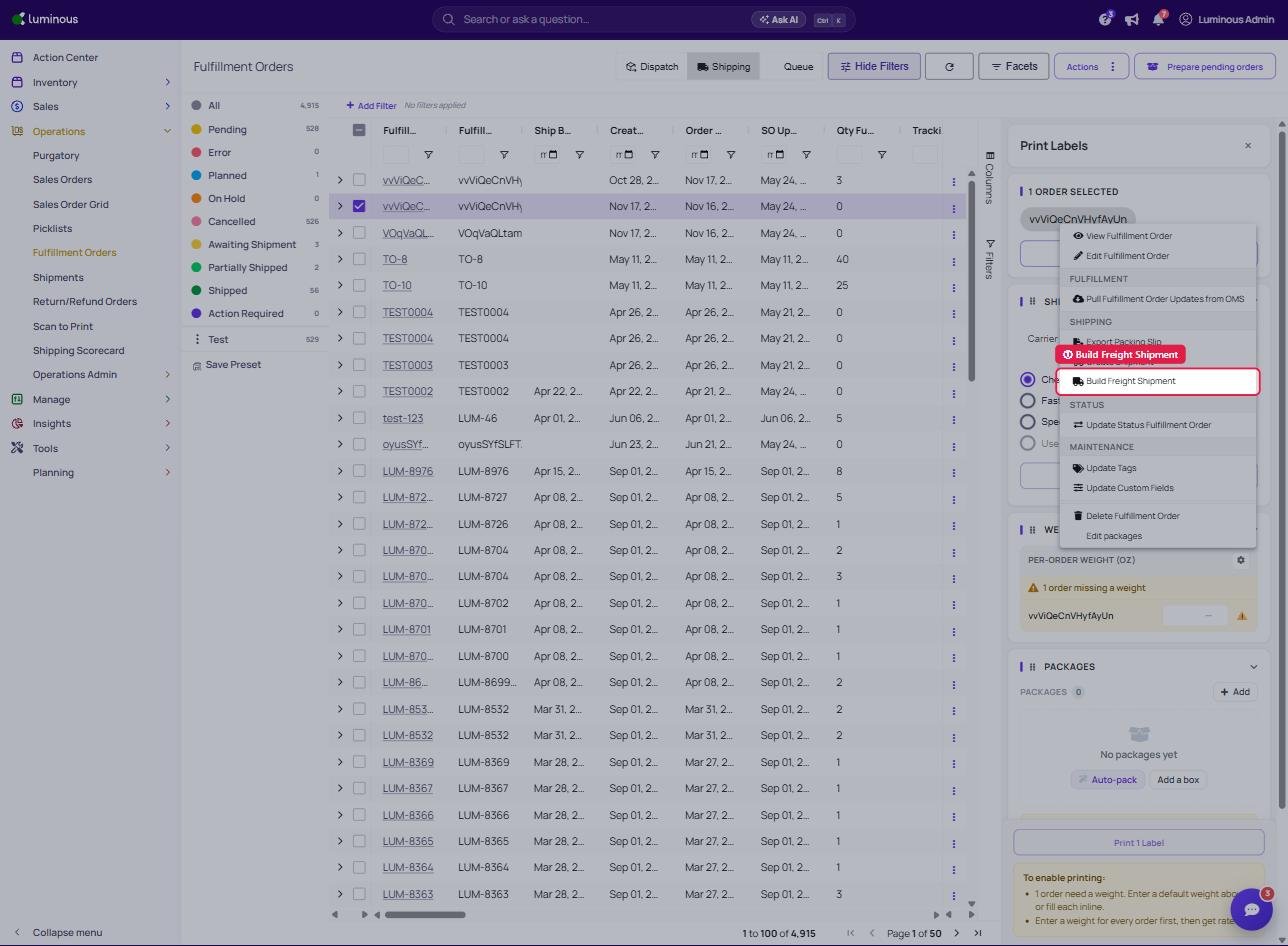
- Go to Operations > Fulfillment Orders
- Select an order you need to create a Freight shipment
- Click the three dots(right side) of the order and select "Build Freight Shipment" from the dropdown list.
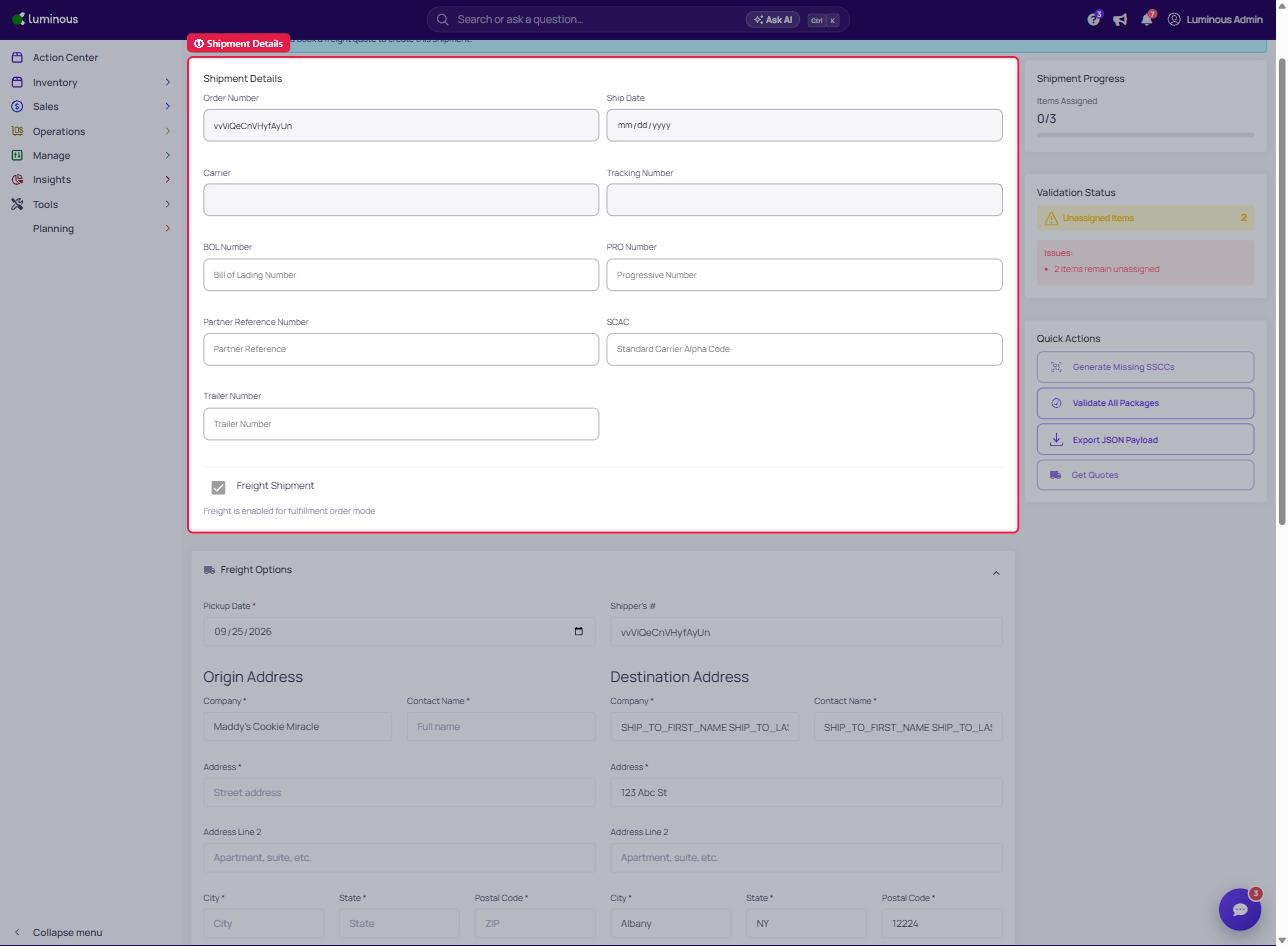
- Inside the Package Builder Page there are 5 sections:
- Shipment Details:
- Order Number – Auto-filled
- Ship Date – Auto-filled
- Carrier – Will be filled out after quote and carrier approval
- Tracking Number – Optional at this stage
- BOL Number / PRO Number – Add once available
- Partner Reference Number – Optional internal reference
- SCAC / Trailer Number – Optional carrier details
- Shipment Details:
Freight Shipment check marked indicator will tell if freight shipment is available for this fulfilment order.
b. Freight Options
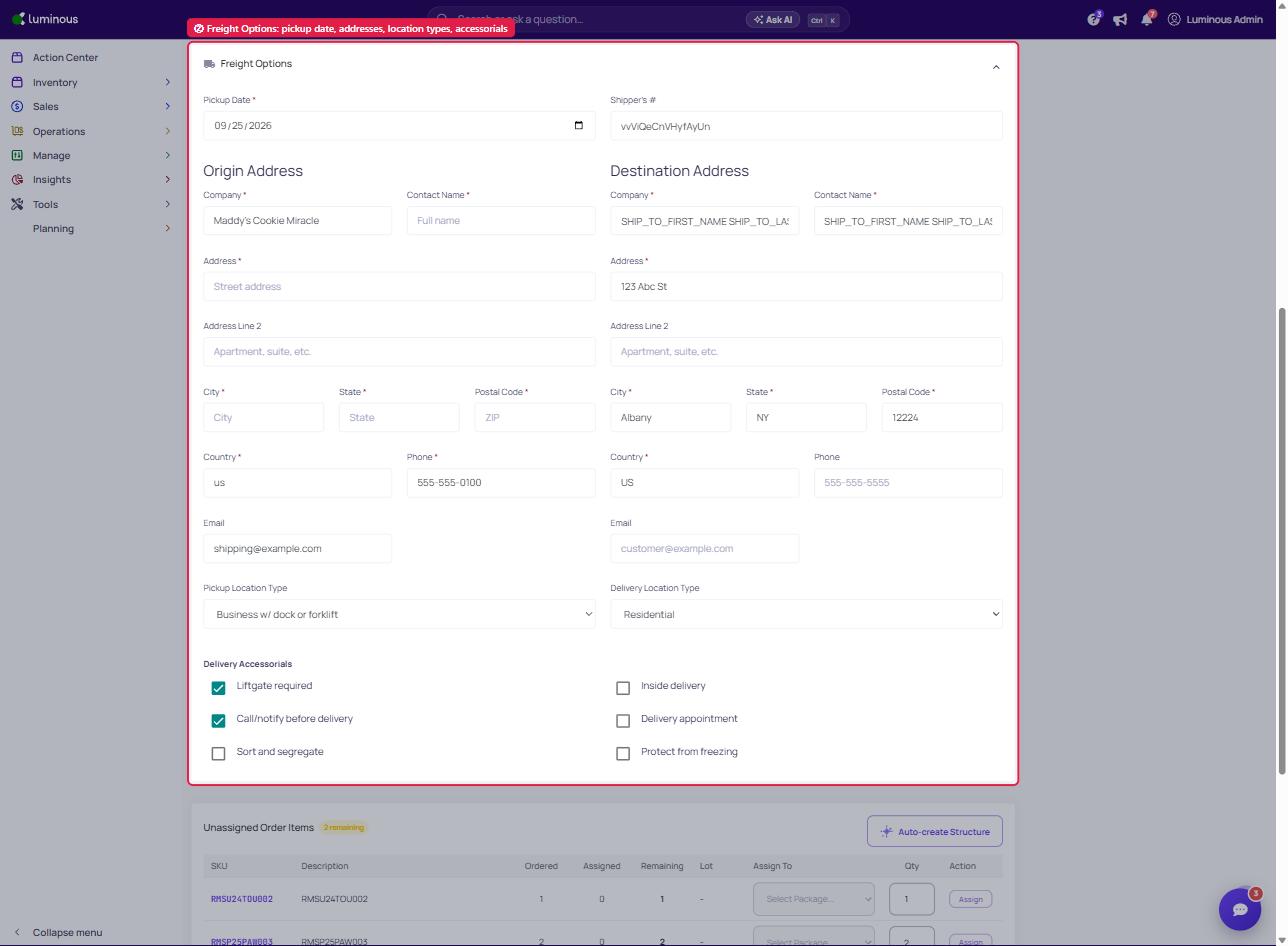
Luminous pre-fills several freight details to reduce setup time:
- Origin address comes from the warehouse group tied to the fulfillment order
- Destination address comes from the order ship-to address
- Package freight details such as weight, dimensions, freight class, and NMFC can be derived from the item data
Users should carefully review these values before requesting quotes. Even though defaults are applied, accurate details are important because freight carriers price shipments based on precise shipment characteristics.
- Delivery Location type and Pickup Location type: Users must define the location type for both pickup and delivery. Available options include:
- Business with dock
- Business without dock
- Residential
This affects both pricing and service availability, since some carriers charge differently depending on whether a truck can access a dock or needs extra unloading support.
- Delivery Accessorials: additional freight services that may be required depending on the shipment or destination. Available accessorials include:
- Liftgate at origin or destination
- Inside Delivery
- Call Before Delivery
- Appointment
- Sort & Segregate
- Protect from Freezing
Important detail: Call Before Delivery and Delivery Appointment cannot both be selected at the same time. These two options are mutually exclusive.
- Select the pickup date: Choose a valid future pickup date. Luminous automatically excludes weekends and U.S. federal holidays from selection. This helps prevent users from booking pickups on invalid days.
c. Unassigned Order Items:
- Each row represents a product in the order
- Key columns include:
- Ordered – Total quantity in the order
- Assigned – Quantity already placed into packages
- Remaining – Quantity still needing assignment
- Assigned to - Product assigned to a box/package/pallet
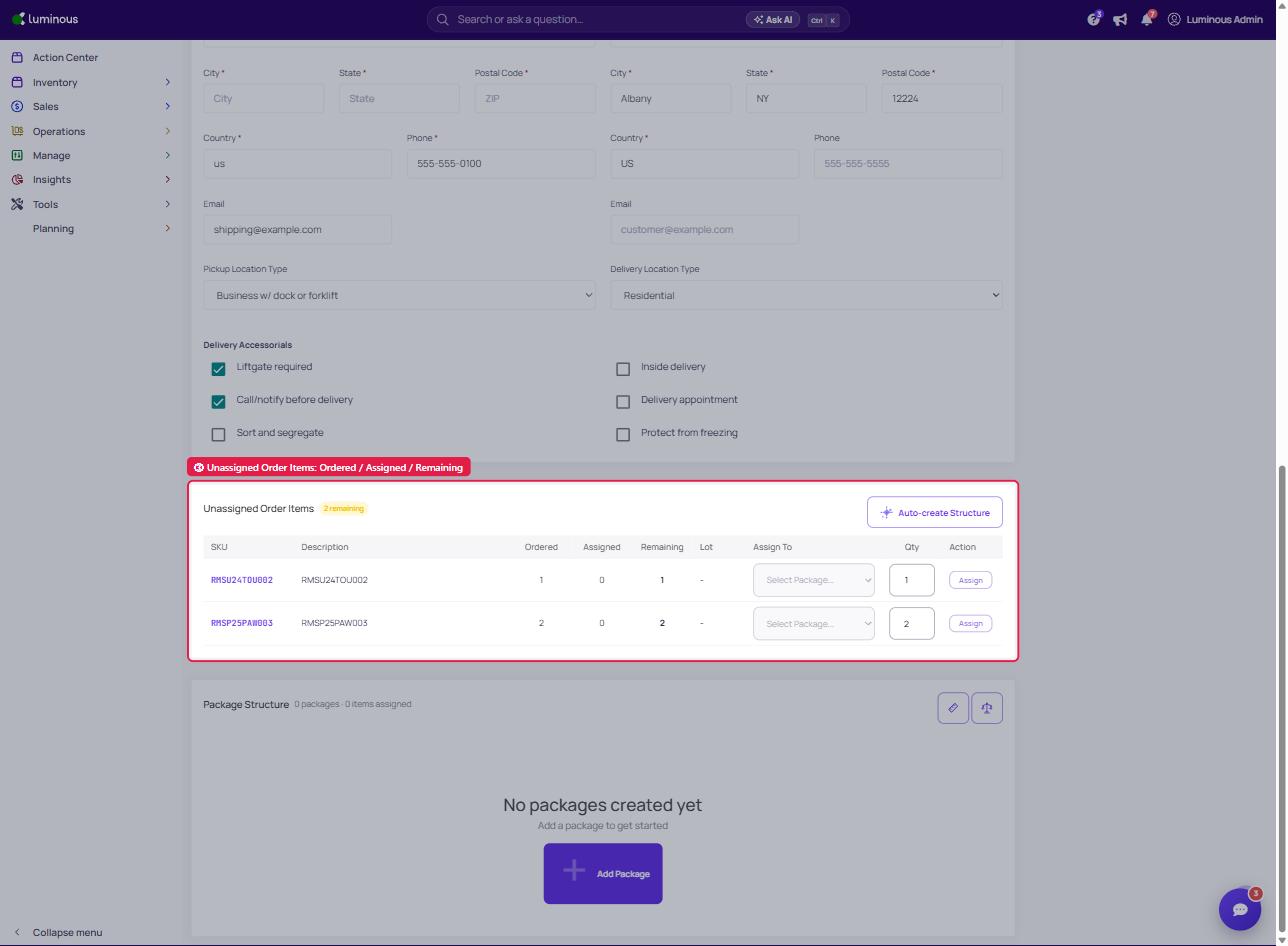
Items must be fully assigned before the shipment can be validated.
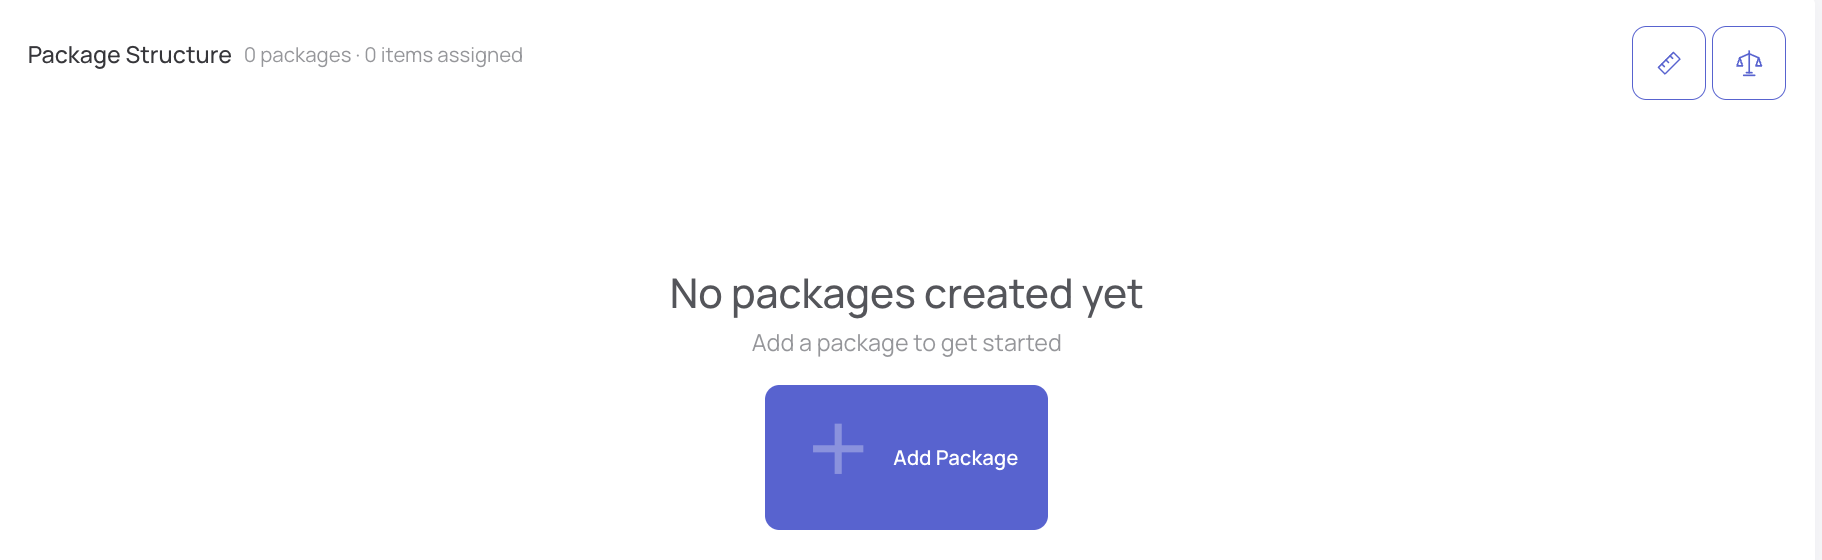
d. Create a Package - In the Package Structure section:
- Click Add Package
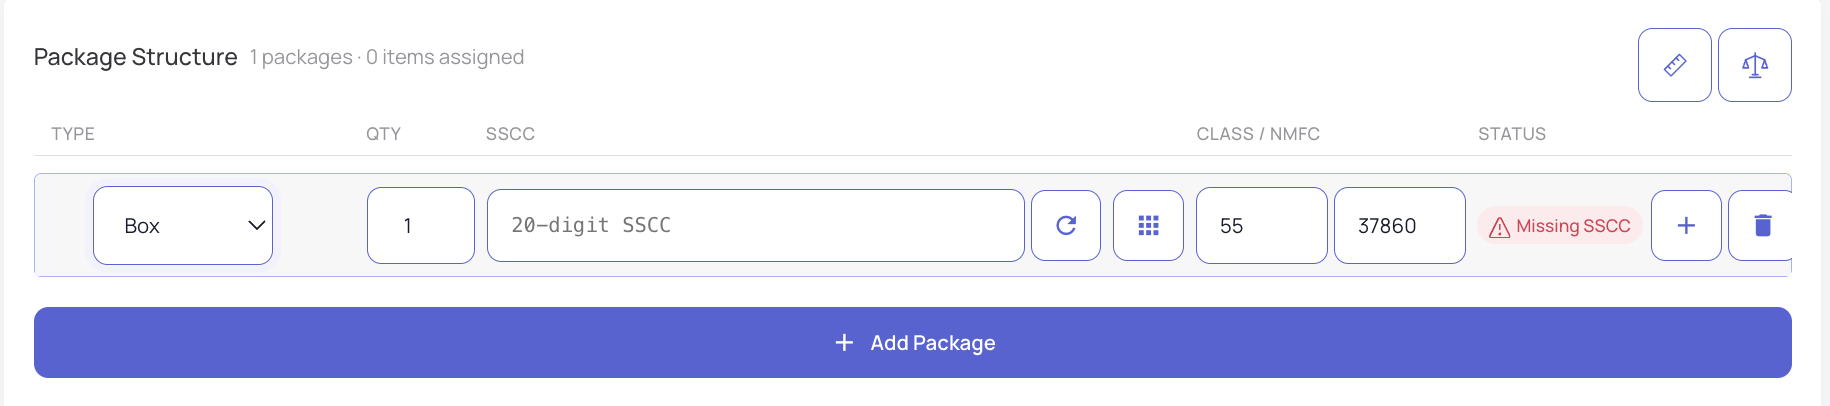
- Select the package Type:
- Pallet
- Case
- Box
- Enter the following details:
- Quantity (QTY) – Number of identical packages
- SSCC – 20-digit serial shipping container code
- Class / NMFC – Freight classification details
If an SSCC is missing, the system will display a “Missing SSCC” warning.
- Assign Items to a Package: Return to the Unassigned Order Items section
- Locate the item to assign
- In the Assign To dropdown, select the desired package
- Selection will be based from the package created on Package structure section.
- Enter the quantity to assign
- Click Assign
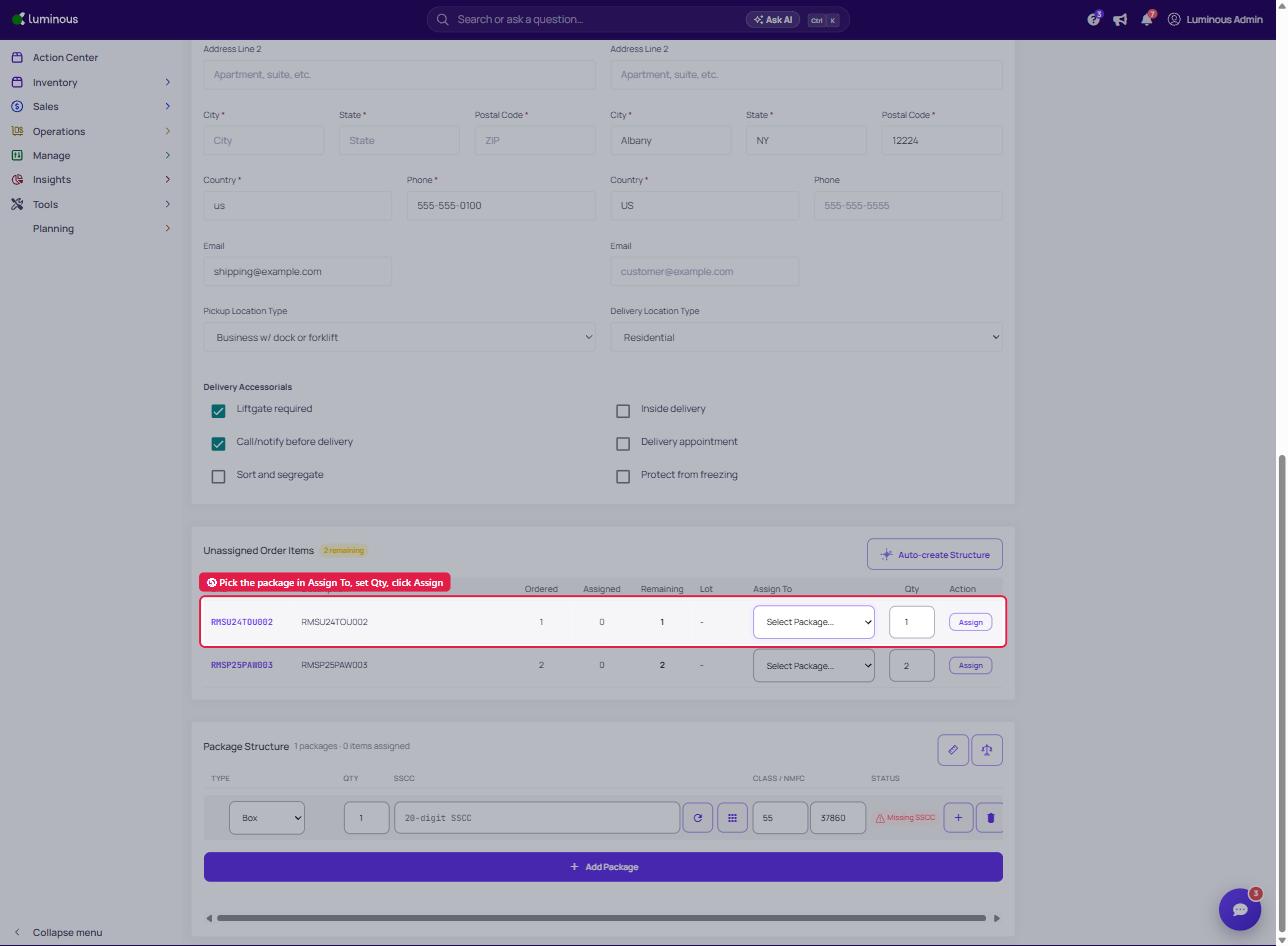
Repeat until the Remaining quantity is reduced to zero for all items.
Use Auto-create Structure (Optional)
To speed up the process:
- Click Auto-create Structure
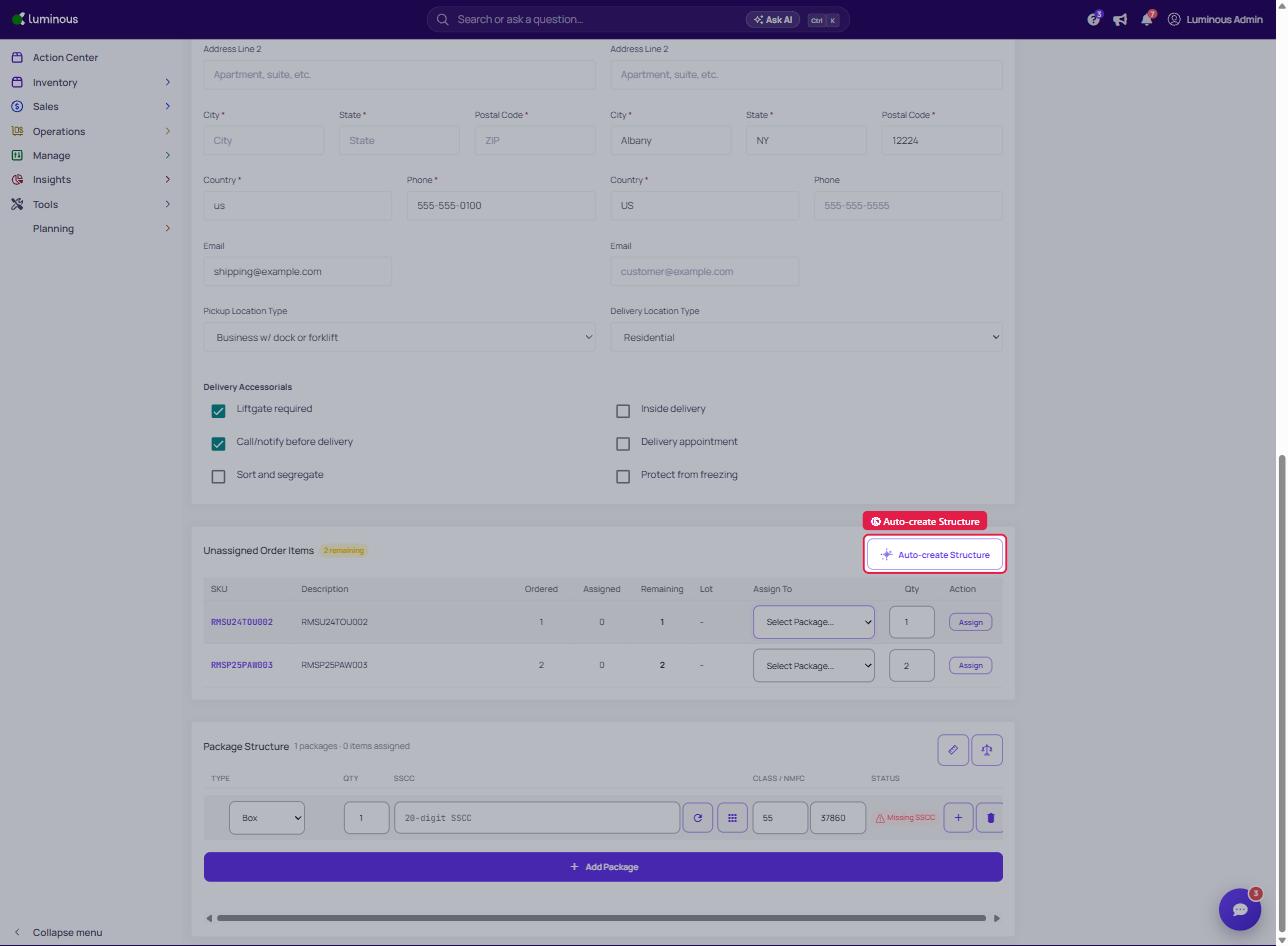
- The system will automatically generate packages and assign items based on default logic
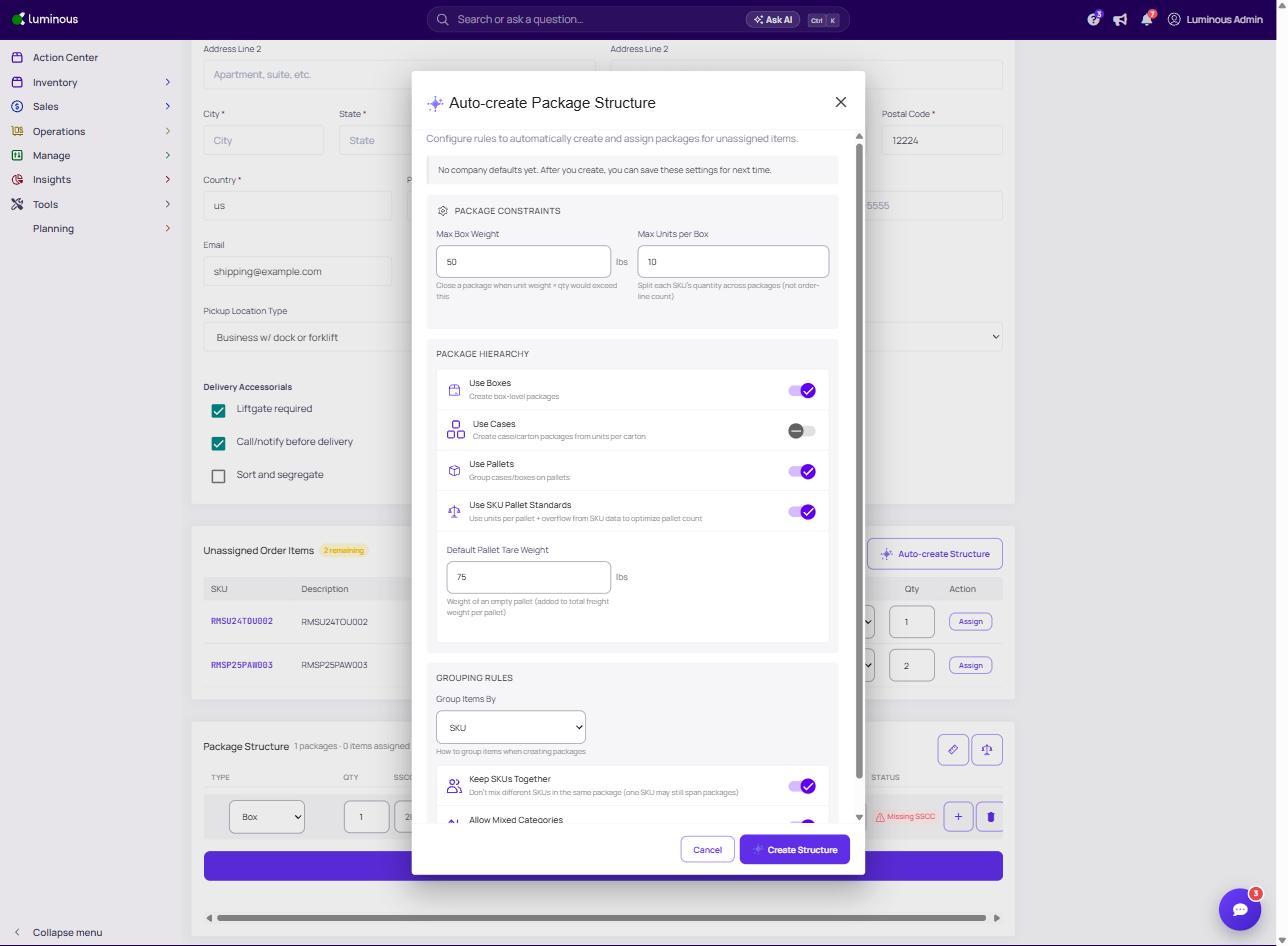
This is useful for large or standard orders.
e. Validating the Package Structure
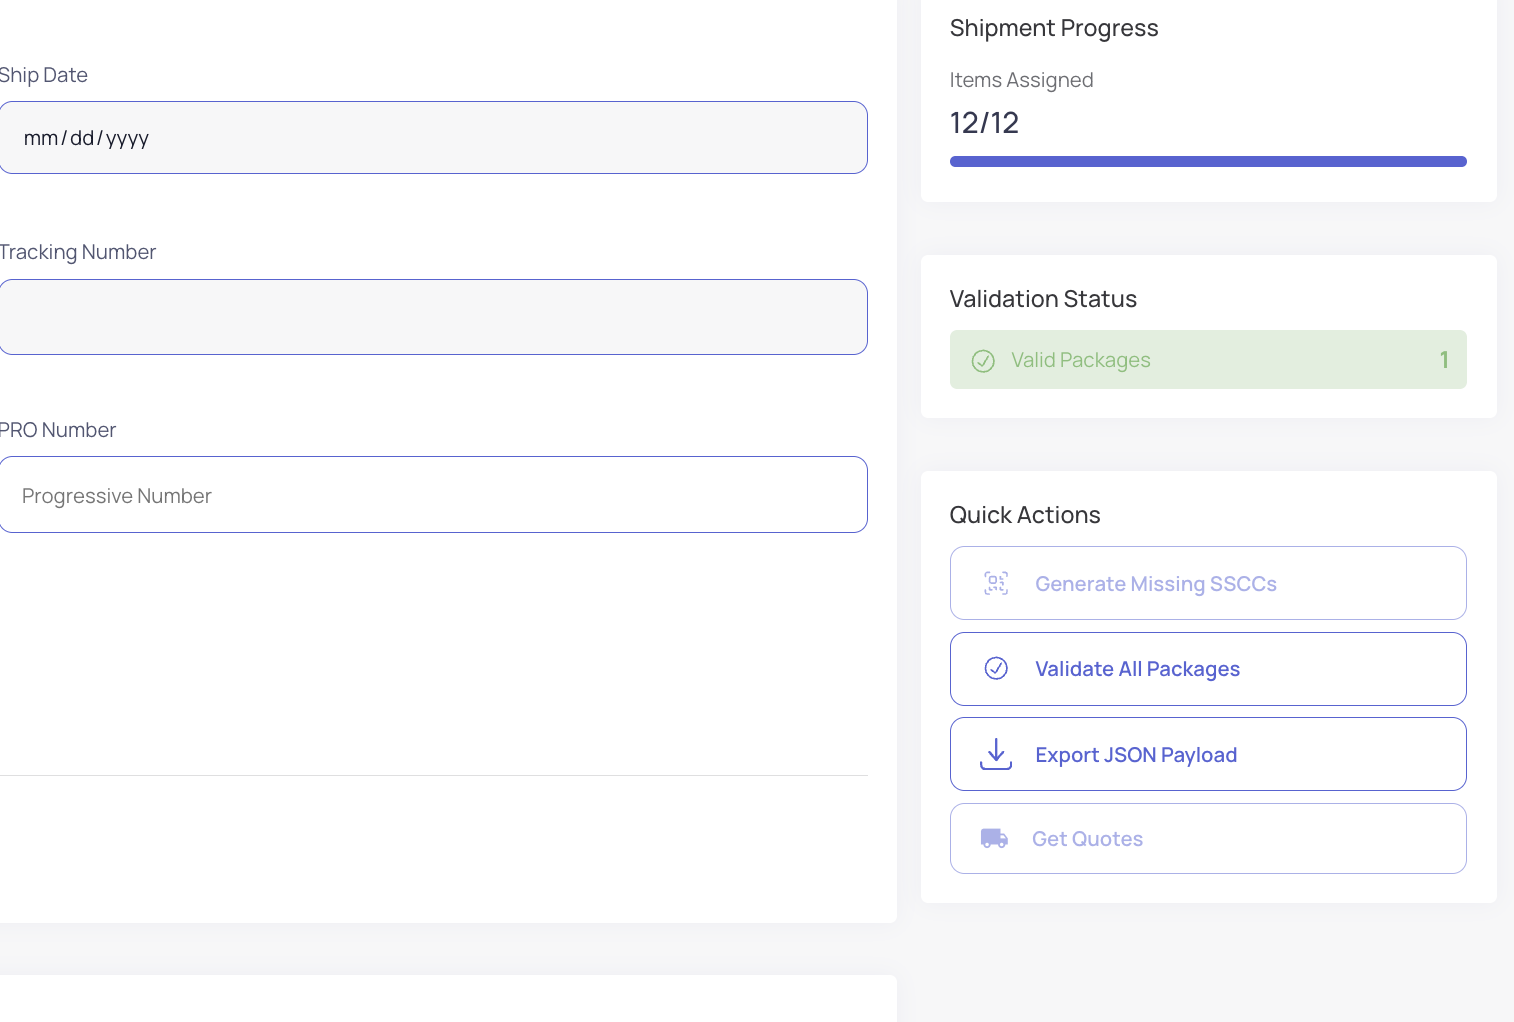
- Check Assignment Status
- The Shipment Progress panel shows how many items are assigned
- The Validation Status panel highlights issues such as:
- Unassigned items
- Missing SSCCs
- Resolve Validation Issues:
- Ensure all items are assigned to packages
- Add missing SSCCs where required
- Confirm all package details are complete
Use:
- Generate Missing SSCCs to auto-fill codes
- Validate All Packages to confirm readiness
Request quotes
Click Get Quotes to send the freight shipment details to Freightview. Freightview then queries supported LTL carriers and returns available quotes. This usually takes a few seconds.
How to Compare and Book a Freight Quote
Once quotes are returned, Luminous displays them in a quote modal. Each quote can include:
- Carrier name
- SCAC code
- Service level
- Price
- Estimated transit time in business days
- Appointment requirement indicator
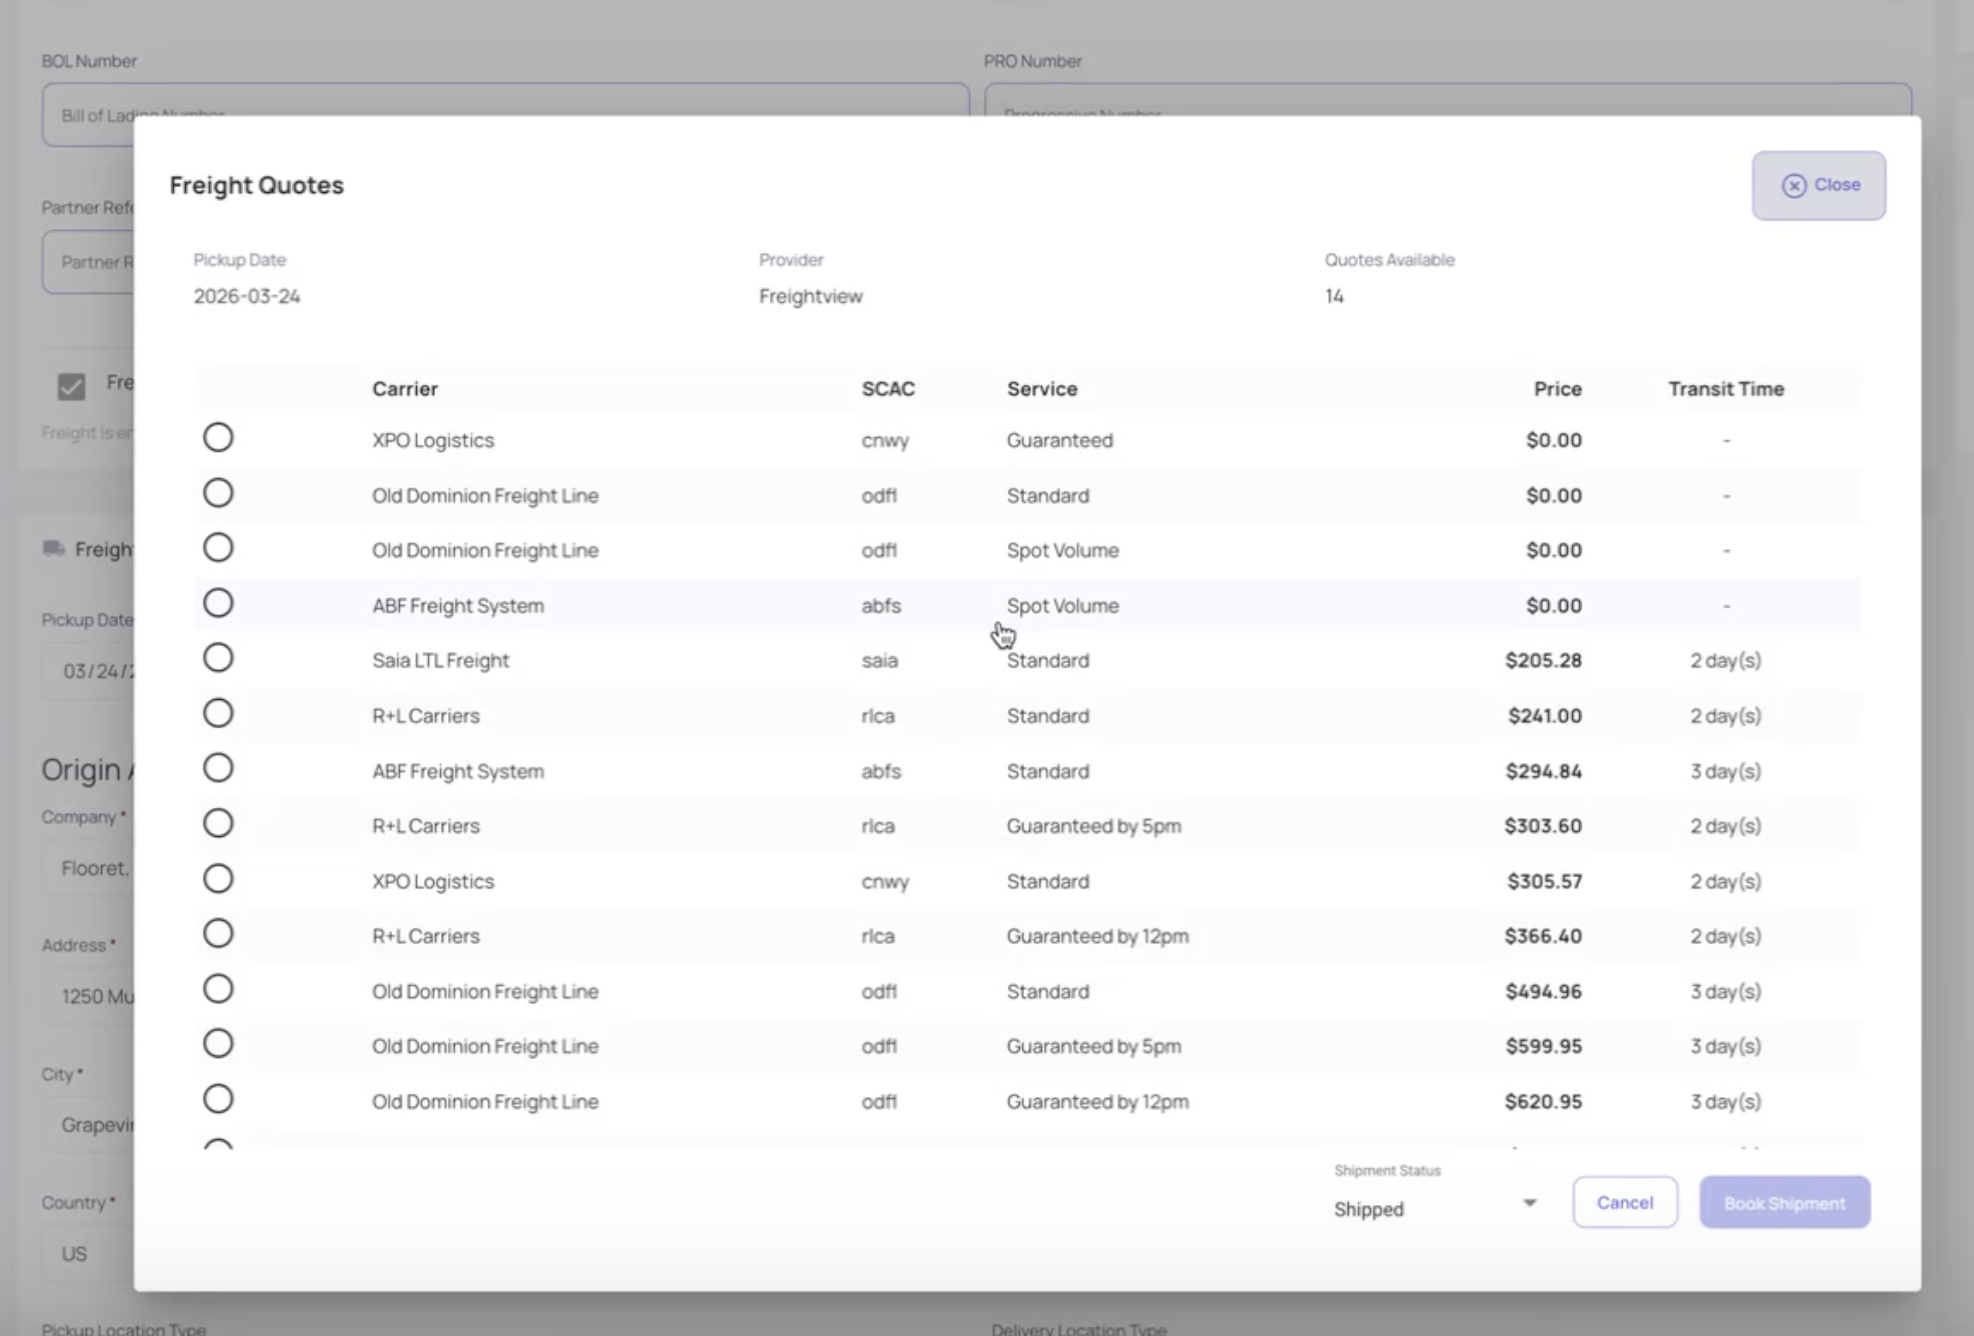
To book a shipment:
- Select the preferred quote
- Choose the shipment status to assign, such as Pending or Shipped
- Click Book Shipment
After booking, Luminous creates or updates the shipment record and stores key shipment data, including:
- Carrier
- Tracking number
- BOL number
- PRO number
- Pickup confirmation
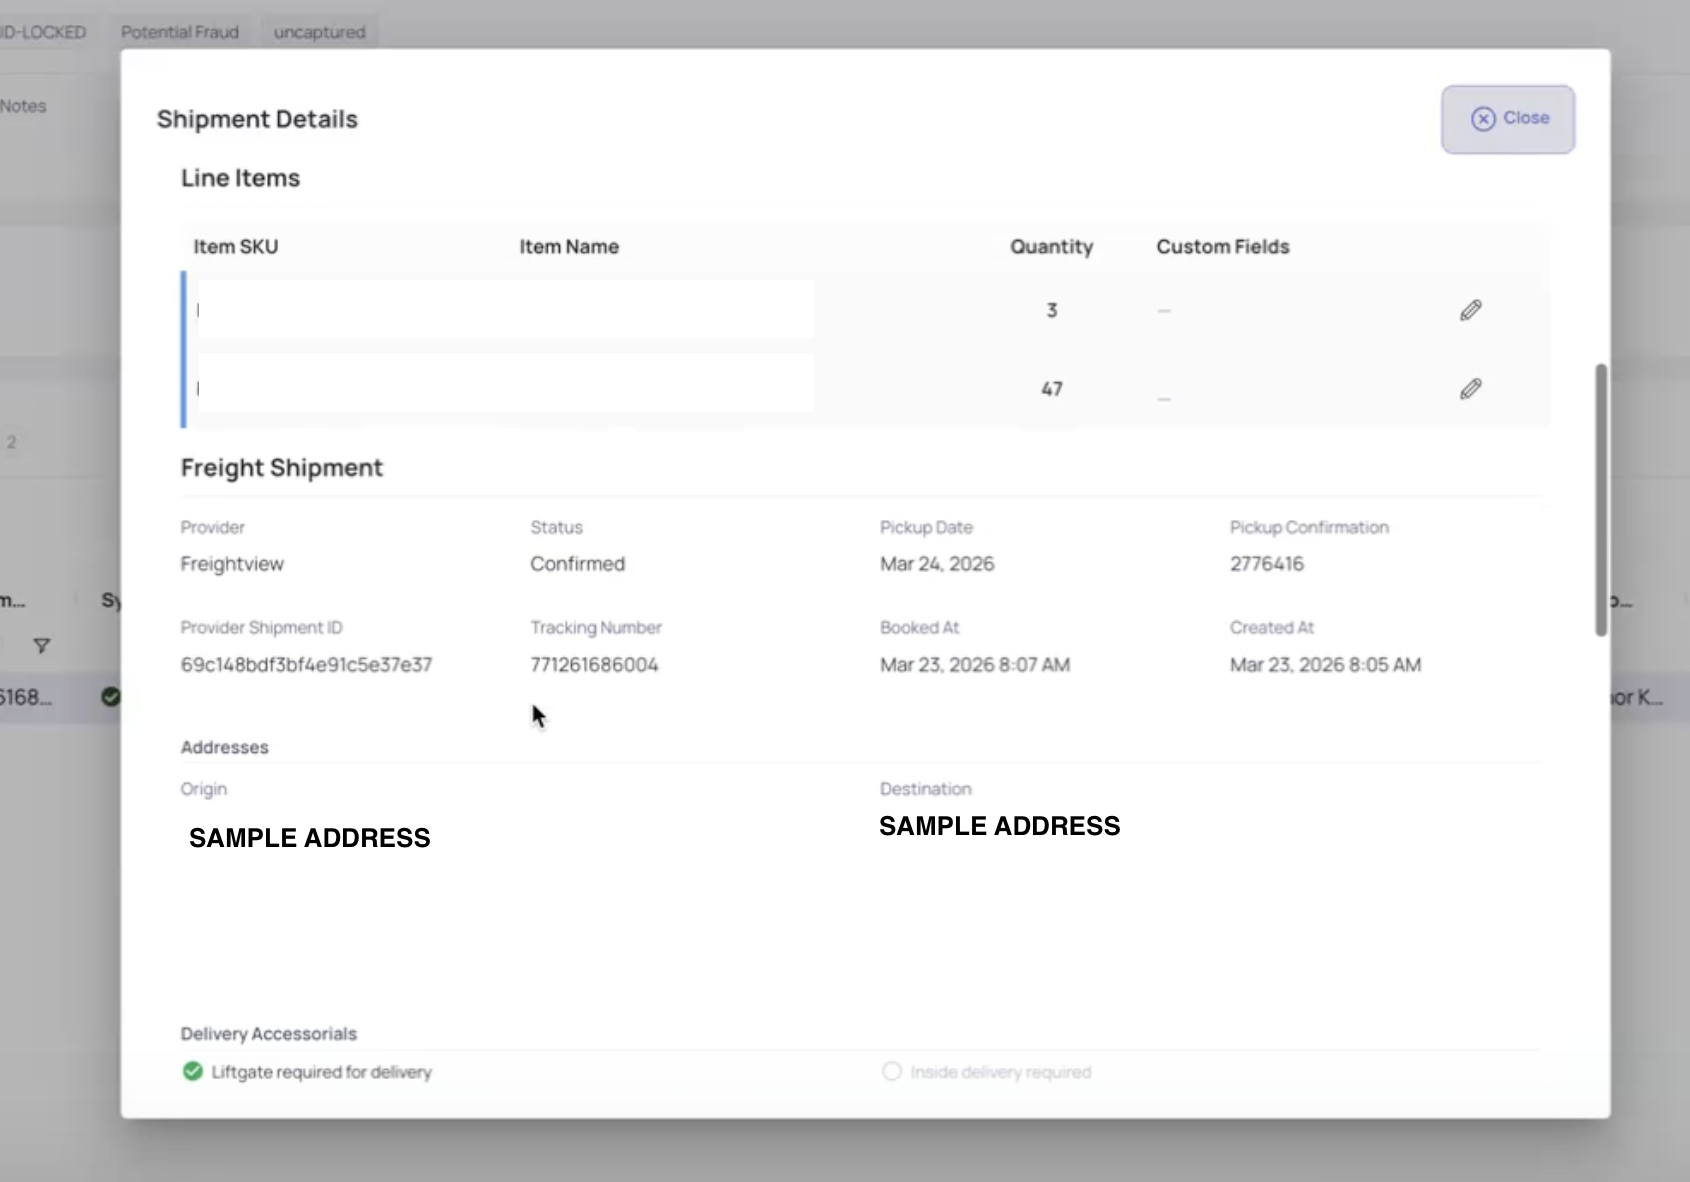
A helpful detail here is that Luminous updates the existing shipment record instead of creating unnecessary duplicates. This preserves a clean one-to-one relationship between the fulfillment order and the freight shipment.
What Happens After Booking
After a freight shipment is booked, Luminous automatically retrieves shipping documents from Freightview. These can include:
- Bill of Lading (BOL) — the shipment contract between shipper and carrier
- Shipping Labels
- Proof of Delivery (POD) — available after delivery
- Packing Slip — generated within Luminous
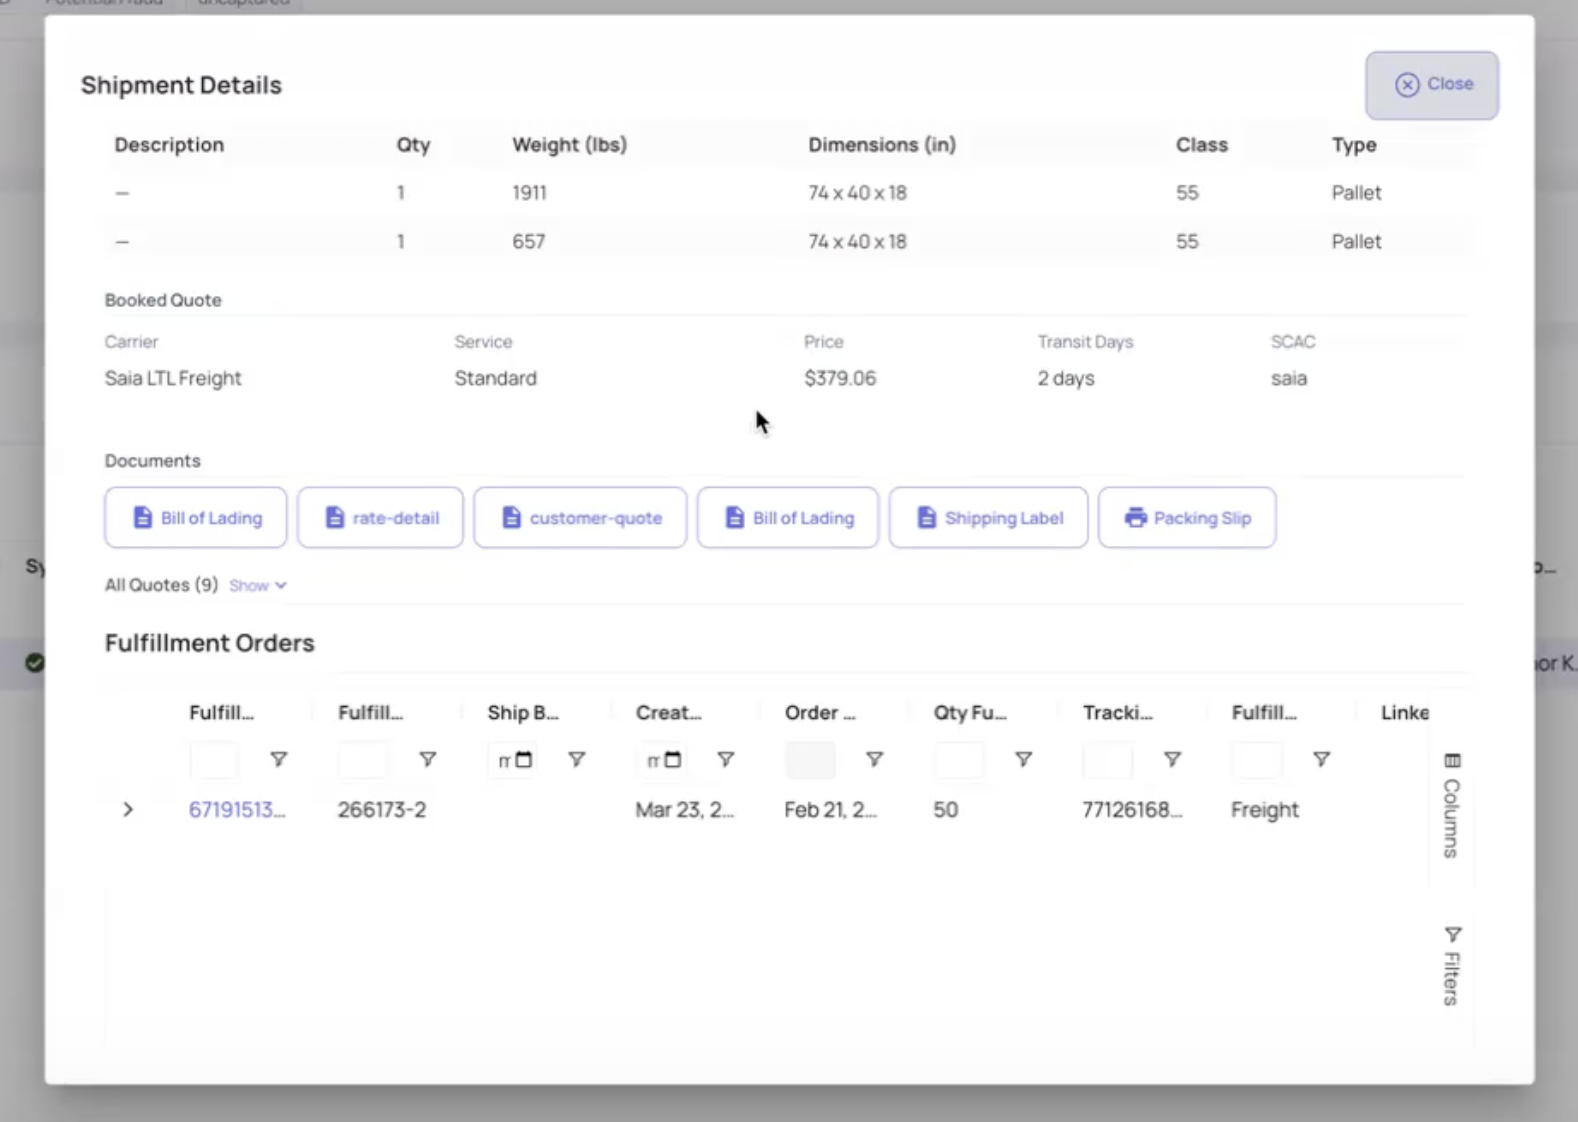
Documents can be downloaded or printed directly from the shipment details. If the Open documents after booking option is enabled, the BOL opens automatically after booking succeeds.
This is especially useful for warehouse teams because shipping paperwork is available immediately and does not need to be manually retrieved from another platform.
How Sync Works Between Freightview and Luminous
The Freightview integration does more than quoting and booking. It also syncs shipment status updates back into Luminous automatically.
Status sync behavior
After a shipment is booked, Luminous periodically checks Freightview for updated shipment statuses. The sync is not real-time, but it keeps active freight shipments updated without requiring manual tracking.
Freightview statuses map into Luminous as follows:
- Pending in Freightview → Pending in Luminous
- Confirmed in Freightview → Pending in Luminous
- Picked Up in Freightview → Shipped in Luminous
- In Transit in Freightview → Shipped in Luminous
- Delivered in Freightview → Shipped in Luminous
- Canceled in Freightview → Voided in Luminous
Once a shipment reaches Delivered or Canceled, Luminous stops polling Freightview for additional updates. This helps avoid unnecessary sync activity for completed shipments.
Why sync matters
The sync is important because it keeps freight visibility inside the order record. Teams do not need to check Freightview separately just to confirm whether a shipment was picked up, is in transit, or has been delivered. This is particularly valuable for customer support and operations teams who need quick status visibility.
Freight Defaults and Smart Logic
Luminous includes several built-in defaults and rules to speed up setup and reduce errors. These include:
- Default freight class: 55
- Default NMFC number: 37860
- Assumed pallet tare weight: 75 lbs
- Default destination location type: Residential
- Liftgate enabled by default
- Call Before Delivery enabled by default
The system also supports smart pallet auto-building. It can calculate an optimal number of pallets based on each product’s units per pallet setting, helping reduce pallet count while respecting capacity constraints.
These defaults are convenient, but they should still be reviewed before requesting a quote. Freight costs can change significantly based on class, dimensions, accessorials, and pickup or delivery conditions.
Important Business Rules
There are several small but important details to understand when using this integration:
One active freight shipment per fulfillment order
Each fulfillment order can have only one active freight shipment at a time. Creating a new freight shipment for the same fulfillment order replaces the previous one with newly generated quotes.
Quotes can expire
Carrier quotes are time-sensitive. If too much time passes before booking, the quote may no longer be valid. Luminous does not automatically refresh expired quotes, so users must manually request new quotes when needed.
Pickup scheduling happens automatically
When a shipment is booked, pickup scheduling is automatically handled with the selected carrier for the chosen pickup date.
Document timing depends on shipment stage
Not all documents are available immediately. For example, the BOL is usually available after booking, but the POD is typically not available until after delivery.
Where to View Freight Shipments Later
Freight shipment details remain visible on the order after booking.
To view them:
- Open the order
- Go to the Shipments tab
- Select the freight shipment record
This detail view can show:
- Selected carrier quote
- Pricing
- Tracking data
- Shipment status
- Available documents such as BOL, labels, and POD
Known Limitations
The current Freightview integration has several limitations to keep in mind:
- Supports LTL freight only
- Does not currently support FTL
- Freightview is the only supported freight provider at this time
- Designed for U.S. domestic shipping
- Status updates are periodic, not real-time
- Expired quotes require manual re-quoting
- Some documents are only available once the carrier provides them
These limitations are important to communicate clearly so users understand what the integration can and cannot do today.
Troubleshooting
No quotes are appearing
Check the following:
- Origin address is complete
- Destination address is complete
- Product weights and dimensions are filled in
- Freightview credentials are valid and connected successfully
- Pickup date is a valid future business day
- The carrier network supports the shipping lane requested
Documents are missing
Some documents are not available immediately. POD, for example, is only available after the shipment reaches the appropriate delivery stage and the carrier provides the file.
Status in Luminous looks behind
Status sync is periodic rather than instant. A short delay between Freightview and Luminous is expected.
A shipment needs to be canceled
Cancellation must be handled in Freightview directly or with the carrier. Once Freightview reflects the cancellation, Luminous updates the shipment status to Voided during the next sync cycle.
Frequently Asked Questions
What is Freightview used for?
Freightview is used for LTL freight rate shopping, booking, and shipment tracking. In Luminous, it allows those tasks to happen directly within the fulfillment workflow.
Can Freightview be used with parcel shipping tools already in place?
Yes. Freightview handles freight shipments, while parcel tools such as ShipStation can continue to handle parcel orders. Both can appear within the same shipment grid on the order.
Can default freight values be changed?
Yes. Defaults such as freight class, NMFC, and accessorial settings can be adjusted before requesting quotes.
What is the difference between Call Before Delivery and Appointment?
Call Before Delivery means the carrier contacts the recipient before arriving, but does not guarantee a scheduled window. Appointment means the delivery is scheduled for a specific time. Only one of these can be selected.
Is this available for every tenant automatically?
No. The Freightview integration is controlled by a feature flag and must be enabled per tenant.
Final Notes
The Freightview integration is a major improvement for teams managing freight inside Luminous. It brings quoting, booking, documents, and tracking into one workflow and reduces the manual effort that freight shipping usually requires. For customers shipping large, palletized, or heavy goods, this creates a faster and more reliable fulfillment process.
For best results, make sure product dimensions, weights, addresses, and freight settings are reviewed carefully before requesting quotes. Small detail errors in freight shipping can lead to pricing issues, booking failures, or service mismatches.
If further assistance is needed, contact the Luminous support team.