Overview: Luminous now allows you to create API tokens with customer PII (Personally Identifiable Information) restriction enabled, which automatically omits or hashes customer-identifying fields in External API responses. This is especially useful for businesses operating in Europe (GDPR compliance) or any organization with strict data privacy and security requirements.
How It Works (Step-by-Step)
- Navigate to Settings (from the user menu, top-right) > Integrations > API Tokens in Luminous.
- Click Create API Token.
- Enter a descriptive Token Label to identify the token's purpose (e.g., "EU Integration - PII Restricted").
- Toggle on Restrict customer PII on External API — when enabled, External API responses will omit or hash customer-identifying fields such as addresses, emails, and phone numbers.
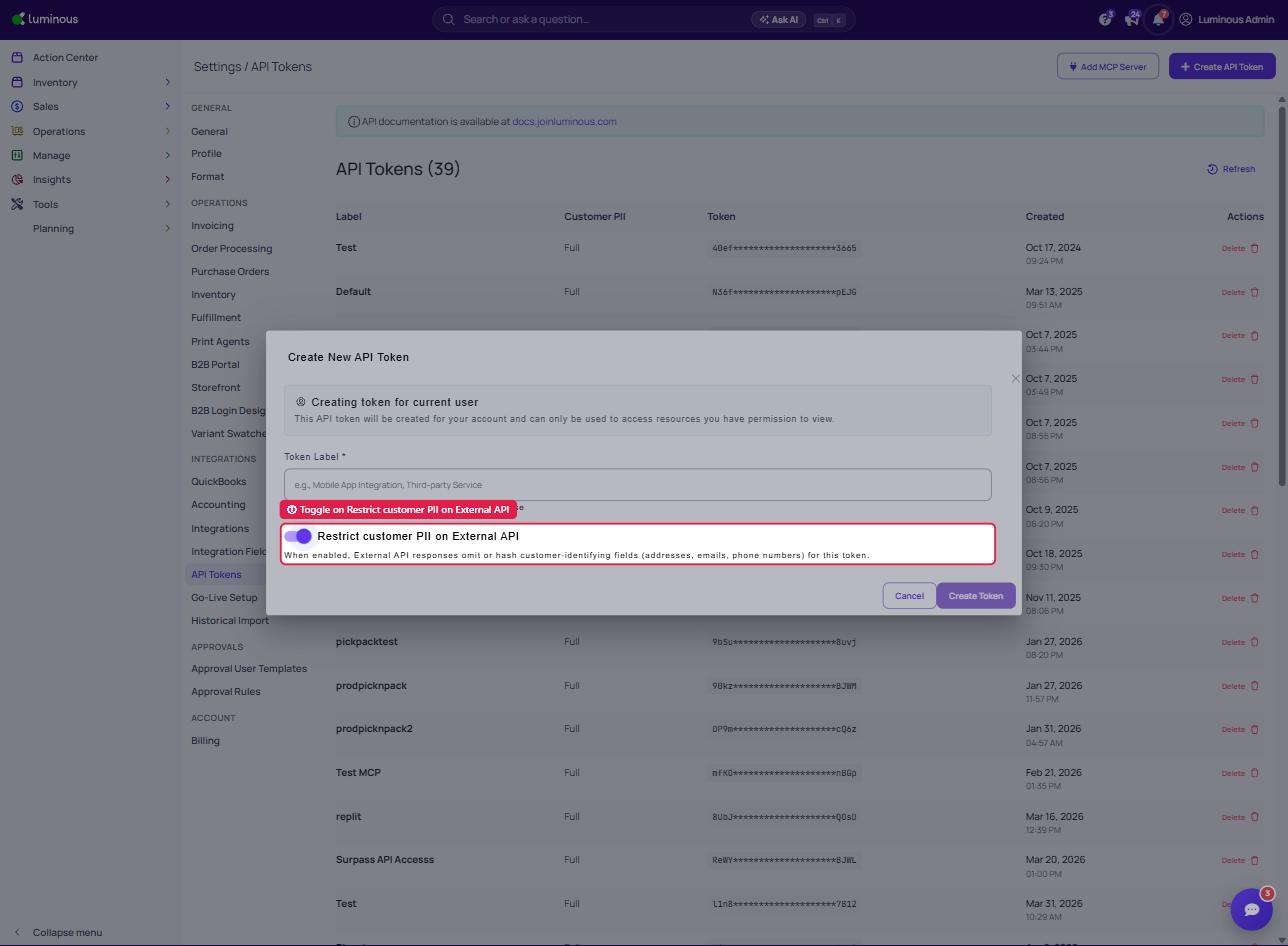
- Click Create Token.
- On the confirmation screen, copy your token immediately — it will only be shown once.
- Note the Customer PII restriction is on confirmation banner, which confirms the setting is active for that token.
- If connecting via Claude Desktop, copy the Luminous MCP Connector URL and paste it under Settings → Connectors → Add custom connector.
- Click I've Saved the Token once you've stored it securely.
Key Features / Options
Restrict customer PII on External API (toggle): When enabled, any external API call using this token will have customer-identifying fields (addresses, emails, phone numbers) either omitted entirely or replaced with hashed values. This is set per token, so you can have both restricted and unrestricted tokens active simultaneously for different integrations.
Token Label: A required field to name and identify the token's purpose — use clear names like "Shopify Integration - PII On" to avoid confusion when managing multiple tokens.
Luminous MCP Connector URL: Automatically generated at token creation, this URL allows you to connect Luminous directly to Claude Desktop or other MCP-compatible tools.
Tips & Best Practices
- Default to PII restriction on for any integration that doesn't explicitly require raw customer data — it's the safer choice.
- Name your tokens descriptively so your team can quickly tell which tokens are PII-restricted and which aren't (e.g., append "-PII" or "-Raw" to the label).
- Store tokens in a password manager or environment variable — never in email, Slack, or version control.
- Delete tokens you no longer use to reduce your security surface area.
- Rotate tokens regularly, especially after team member changes.
- Only disable PII restriction when the integration has a legitimate, documented need for raw customer data.
FAQs & Troubleshooting
Q: What fields are affected by PII restriction? Fields such as customer addresses, email addresses, and phone numbers will be omitted or hashed. Internal order or inventory data is not affected.
Q: Can I enable PII restriction on an existing token? No — PII restriction is set at the time of token creation and cannot be changed afterward. If you need to change this setting, delete the old token and create a new one with the desired configuration.
Q: I forgot to copy my token. What do I do? Tokens are shown only once. If you missed it, delete the token and create a new one.
Q: How do I know if a token has PII restriction active? The token creation confirmation screen displays a "Customer PII restriction is on" banner. Afterwards, the Customer PII column in the API Tokens list shows each token's setting.
Q: Does this affect internal Luminous UI data or only API responses? This only applies to External API responses using that token. The Luminous interface itself is unaffected.
Additional Help
If you run into issues creating tokens or have questions about which PII settings are right for your integration, reach out to the Luminous support team directly for guidance.