Overview
The Fulfillment Orders grid now supports advanced date range filtering and saved filter presets, allowing you to quickly narrow down records by date and save those views for repeated use. Use this feature when you need to review fulfillment activity within a specific time window or want to standardize a grid view your team returns to frequently.
How It Works (Step-by-Step)
Using Advanced Date Filtering
- Navigate to Operations > Fulfillment Orders from the left-hand menu.
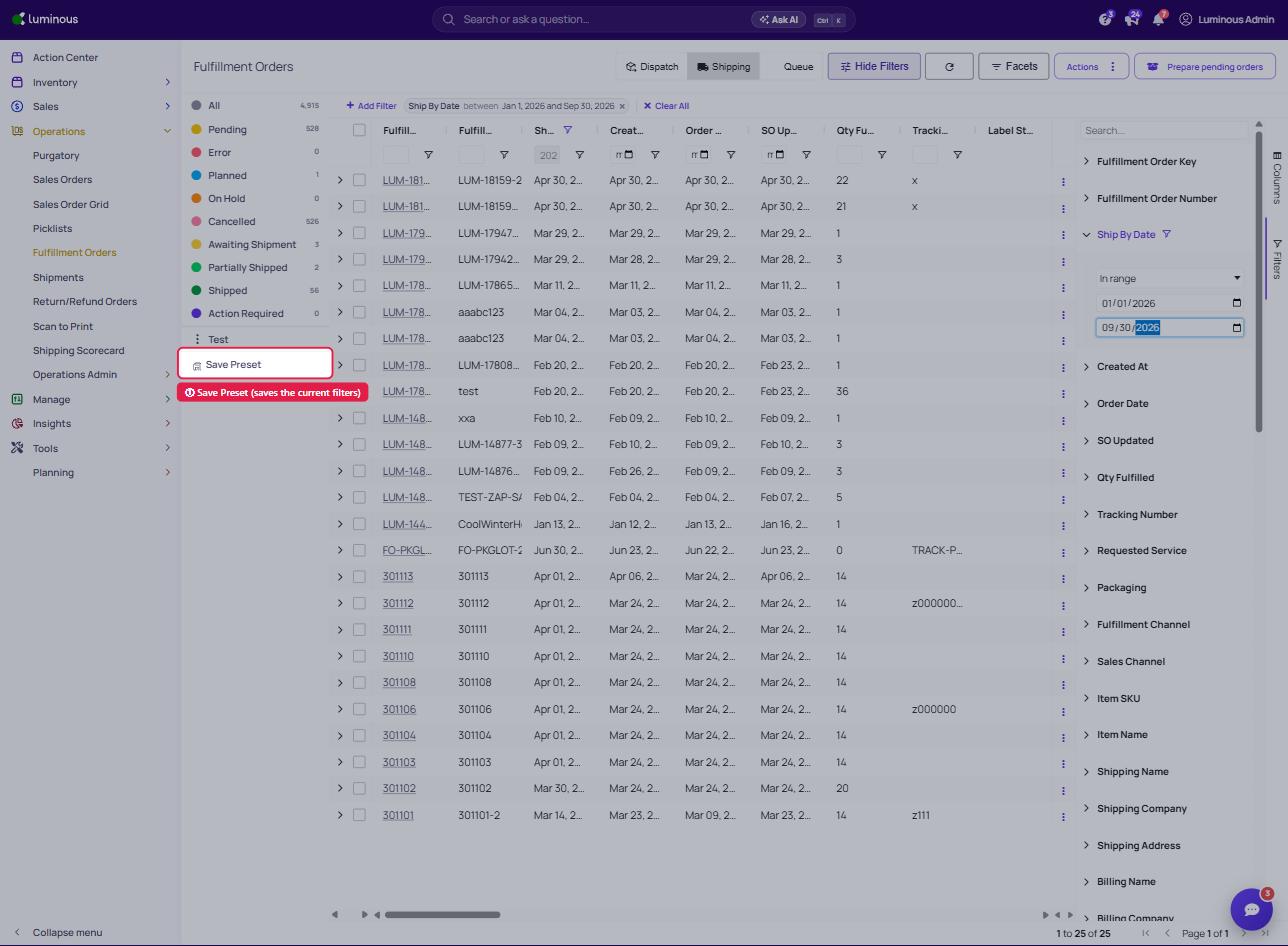
- Click the Filters icon on the right side of the grid to open the filter panel.
- Locate the Ship By Date field (or another date column such as Created At) and click to expand it.
- Use the "In range" dropdown to select your filter type. Options include:
- In range — Enter a start date and end date (e.g., 02/01/2026 to 03/01/2026)
- Less than — Show records before a specific date
- Greater than — Show records after a specific date
- Enter your date(s) using the date picker fields that appear.
- The grid refreshes automatically once the dates are entered, and the active filter appears as a chip above the grid. Click the × on the chip (or Clear All) to clear the filter and return to the full view.
- You can stack multiple date filters (e.g., filter by both Ship By Date and Created At) for more precise views.
Using Column Filters Alongside Date Filters
Beyond dates, the filter panel also supports filtering by:
- Tracking Number
- Qty Fulfilled
- Fulfillment Warehouse Group
- Fulfillment Channel
- Destination OMS Store
- Cost
- Status
Combine these with your date filters to create highly targeted grid views.
Saving Grid Presets
- Apply the date filters and any other column filters you want to save.
- Scroll to the bottom of the left-hand status sidebar (below All, Pending, Error, Planned, etc.).
- Click Save Preset.
- Name your preset (e.g., "Feb Fulfillment Orders" or "FM").
- The preset will now appear in the sidebar under the status list, alongside any existing presets (e.g., Paws, Feb FO, FM).
- Click a saved preset at any time to instantly reload that filtered view.
- To manage a preset, click the three-dot menu (⋮) next to its name to rename or delete it.
Key Features & Options
"In Range" Date Filter — The most common option. Lets you define a start and end date to view fulfillment orders that fall within that window. Ideal for weekly or monthly reviews.
Filter chips / Clear All — Each active filter shows as a chip above the grid. Click its × to remove just that filter, or Clear All to remove every filter.
Saved Presets — Presets persist across sessions, so your team can access standardized views without rebuilding filters each time. Each preset stores the full filter state of the grid at the moment it was saved.
Column Visibility (Columns tab) — Located on the far right of the grid, the Columns panel lets you show or hide grid columns. Column visibility is saved independently from filter presets.
Tips & Best Practices
- Name presets clearly. Use names that reflect the filter criteria (e.g., "March Ship By" or "Shopify – Feb") rather than generic names like "My View." This makes shared presets easier for teammates to identify.
- One preset per common workflow. If your team reviews fulfillment orders by month, create one preset per month rather than editing the same preset repeatedly.
- Reset before applying a new filter. If a prior filter is still active and you forget to clear it, your results may be more narrow than intended. Always check the filter panel for any pre-applied conditions before adding new ones.
- Date filtering is display-only. Applying a date filter does not affect any fulfillment orders, their status, or their processing. It only changes what you see on screen.
- Presets do not auto-update. If you save a preset using a specific date range (e.g., 02/01/2026–03/01/2026), that range is saved as-is. You will need to update and re-save the preset when the date window changes.
FAQs & Troubleshooting
Q: I applied a date filter but the grid still shows orders outside that range. A: Check that you clicked Apply after entering the dates. If the filter appears active but results look off, try clicking Reset and re-entering the date range, then Apply again.
Q: My preset is showing incorrect results. A: Presets save the filter state at the time of creation. If the date range is now outdated, edit your filters, then re-save the preset using the same name.
Q: Can multiple team members use the same preset? A: Yes, filters created in this view are available for all team members.
Q: The "Save Preset" option is not visible. A: Make sure you are on the Fulfillment Orders grid (Operations > Fulfillment Orders). The Save Preset option appears at the bottom of the left sidebar. If you do not see it, try scrolling down in the sidebar below the status labels.
Q: Can I apply a date filter and a status filter at the same time? A: Yes. You can combine the date filter with any status (e.g., Pending, Awaiting Shipment) by clicking a status from the left sidebar while the date filter is active. Both will apply simultaneously.
Q: Does filtering by date affect exports? A: If you export data while a date filter is active, the export will reflect the filtered view only — not the full dataset. Clear your filters first if you need a complete export.
Additional Help
If you run into issues not covered above or need help setting up a preset for your team's workflow, reach out to Luminous Support directly through the in-app chat or at help@joinluminous.com.