Overview
Work Orders in Luminous allow brands to manage outsourced production with co-manufacturers (Co-Man) end-to-end — all within a single workflow. Instead of manually coordinating separate Purchase Orders, Assembly Orders, and Transfers, Work Orders consolidate them into one place, providing full visibility into raw material sourcing, vendor-supplied components, production tracking, and finished goods receiving.
Use a Work Order any time you are producing goods with an external co-manufacturer, especially when some components are brand-supplied and others are vendor-supplied, or when production happens in multiple stages.
Quick reference:
- Work Order → outsourced production with a co-manufacturer
- Purchase Order → buying finished goods directly
- Assembly Order → building products in-house with no co-manufacturer
When to Use a Work Order
A Work Order is the right tool when any of the following apply:
- You are working with a co-manufacturer to produce finished goods
- Some components are brand-supplied while others are vendor-supplied
- Production involves multiple steps or layered assemblies (e.g., Raw Materials → Subassembly → Finished Product)
- You need to track raw material stock separately from finished goods
- You expect to receive finished goods in batches (partial receipts)
- You want all related POs, Assembly Orders, and Transfer Orders visible in one place
- You need an exportable document to send to your co-manufacturer in place of a traditional PO
How It Works: Step-by-Step
Step 1 — Create a New Work Order
Navigate to: Inventory > Work Orders > Create Work Order
- Select the finished good SKU you want to produce. (only SKUs with BOM)
- Enter the Planned Quantity.
- Under the Logistics section, fill out the following:
- Select Production Location (the co-manufacturer's facility) and Destination Warehouse
- Select the Vendor/Co-manufacturer
- Fill out the Manufacturing Service Fee. Enter the per-unit fee the co-manufacturer charges for their service. This fee is baked into COGS at the time of production — no separate subcontract PO is required.
- In the Schedule & Completion section:
- Select the Expected Completion Date
- Choose a Completion Trigger:
- Finish Step — Work order completes when all production steps are marked finished.
- Receipt — Work order completes only after finished goods are received at the destination warehouse.
- Optional: You can input Additional Information
- Notes and Alternate IDs (External references such as customer PO numbers or legacy system IDs)
Tip: The manufacturing service fee replaces the old subcontract PO. You no longer need to create or receive a separate PO for the co-manufacturer's service — the fee is applied automatically when production is recorded.
Step 2 — Review the Bill of Materials & Assign Supply Methods
Luminous automatically loads the SKU's Bill of Materials (BOM). For each component, you must assign a Supply Method:
| Supply Method | When to Use |
|---|---|
| Purchase Order | The component must be ordered from a third-party vendor. The system shows current stock levels and highlights shortages in red. You can link an existing incoming PO or generate a new one. |
| Vendor / Co-Manufacturer | The co-manufacturer provides this component as part of their service. No internal inventory tracking is required for these items. |
| Transfer Order | The component already exists in your internal inventory and needs to be shipped to the co-manufacturer's facility. Luminous generates an internal transfer order. |
| Assembly Order | The component needs to be assembled internally before being sent to the co-manufacturer. |

Stock status indicators: On-hand and available inventory is displayed per component. Shortages appear in red; sufficient stock turns green. The display also shows any incoming POs or stock at other warehouse locations.
Bulk assignment shortcuts: Use "Set All to Brand Supplied" or "Set All to Vendor Supplied" to quickly assign the same method to all components at once.
Click Save after choosing the Supply Method.
Important — when stock is committed: Stock is committed to the work order as soon as you move it to In Progress status. While the work order is in Planned status, you are gathering inventory and making adjustments. Clicking Start (found when you click into the work order itself) commits the stock, which prevents it from being double-counted across other work orders or production runs that share the same BOM components.
Step 3 — Generate Purchase Orders & Transfer Orders
From the Work Order detail page:
-
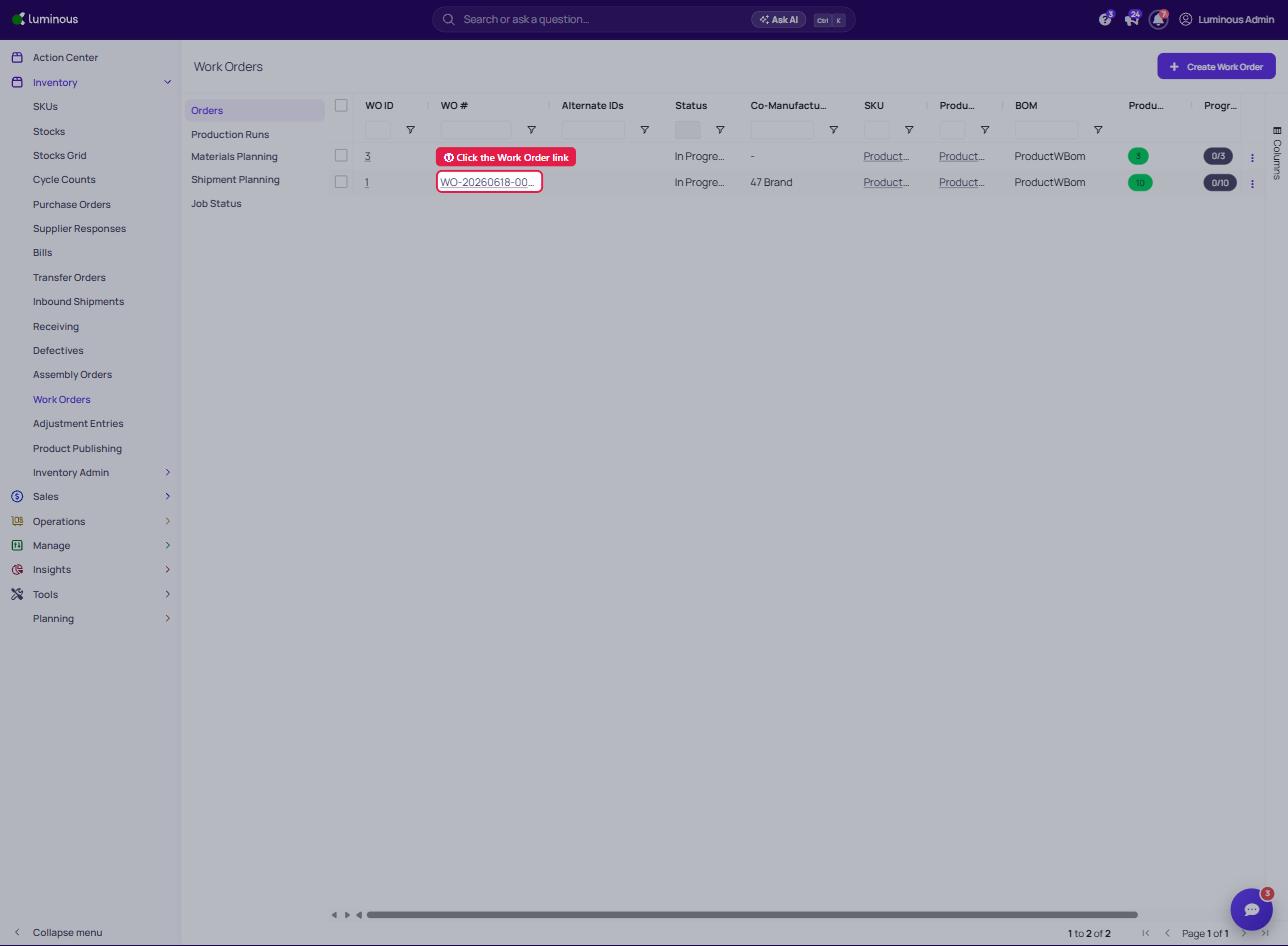
On the Work Order page, click the link of the Work Order.
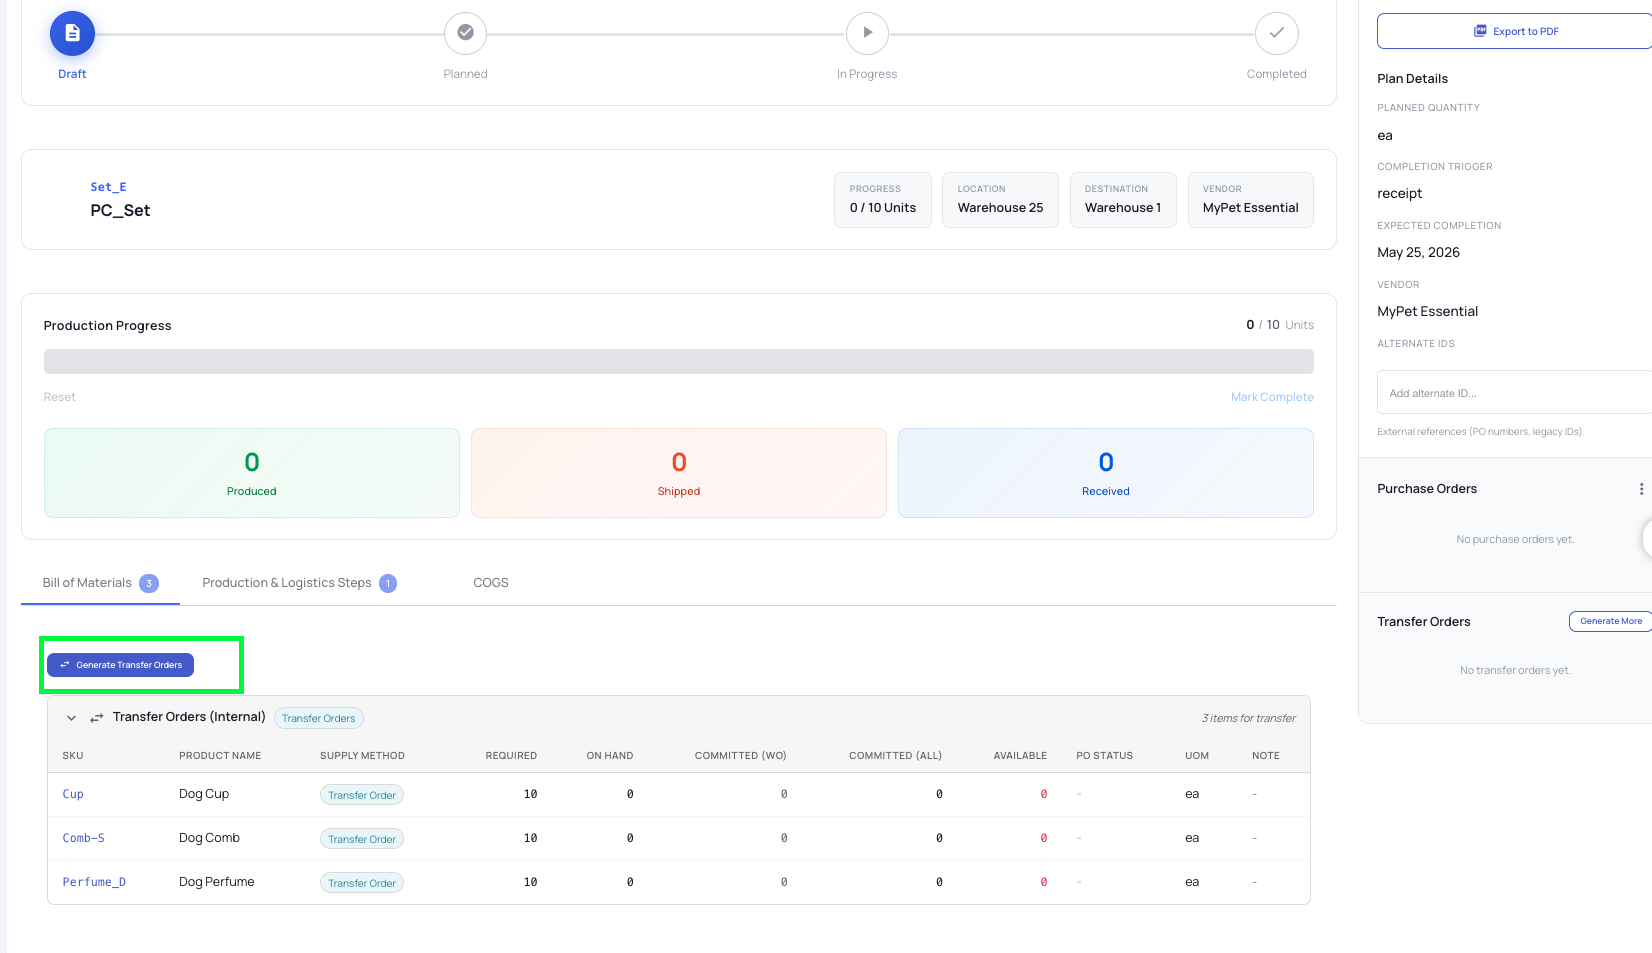
- Click Generate Purchase Orders to auto-create POs for any brand-supplied components that need to be ordered or;
- Click Generate Transfer Orders to auto-create internal transfers for components already in stock at another location.
-
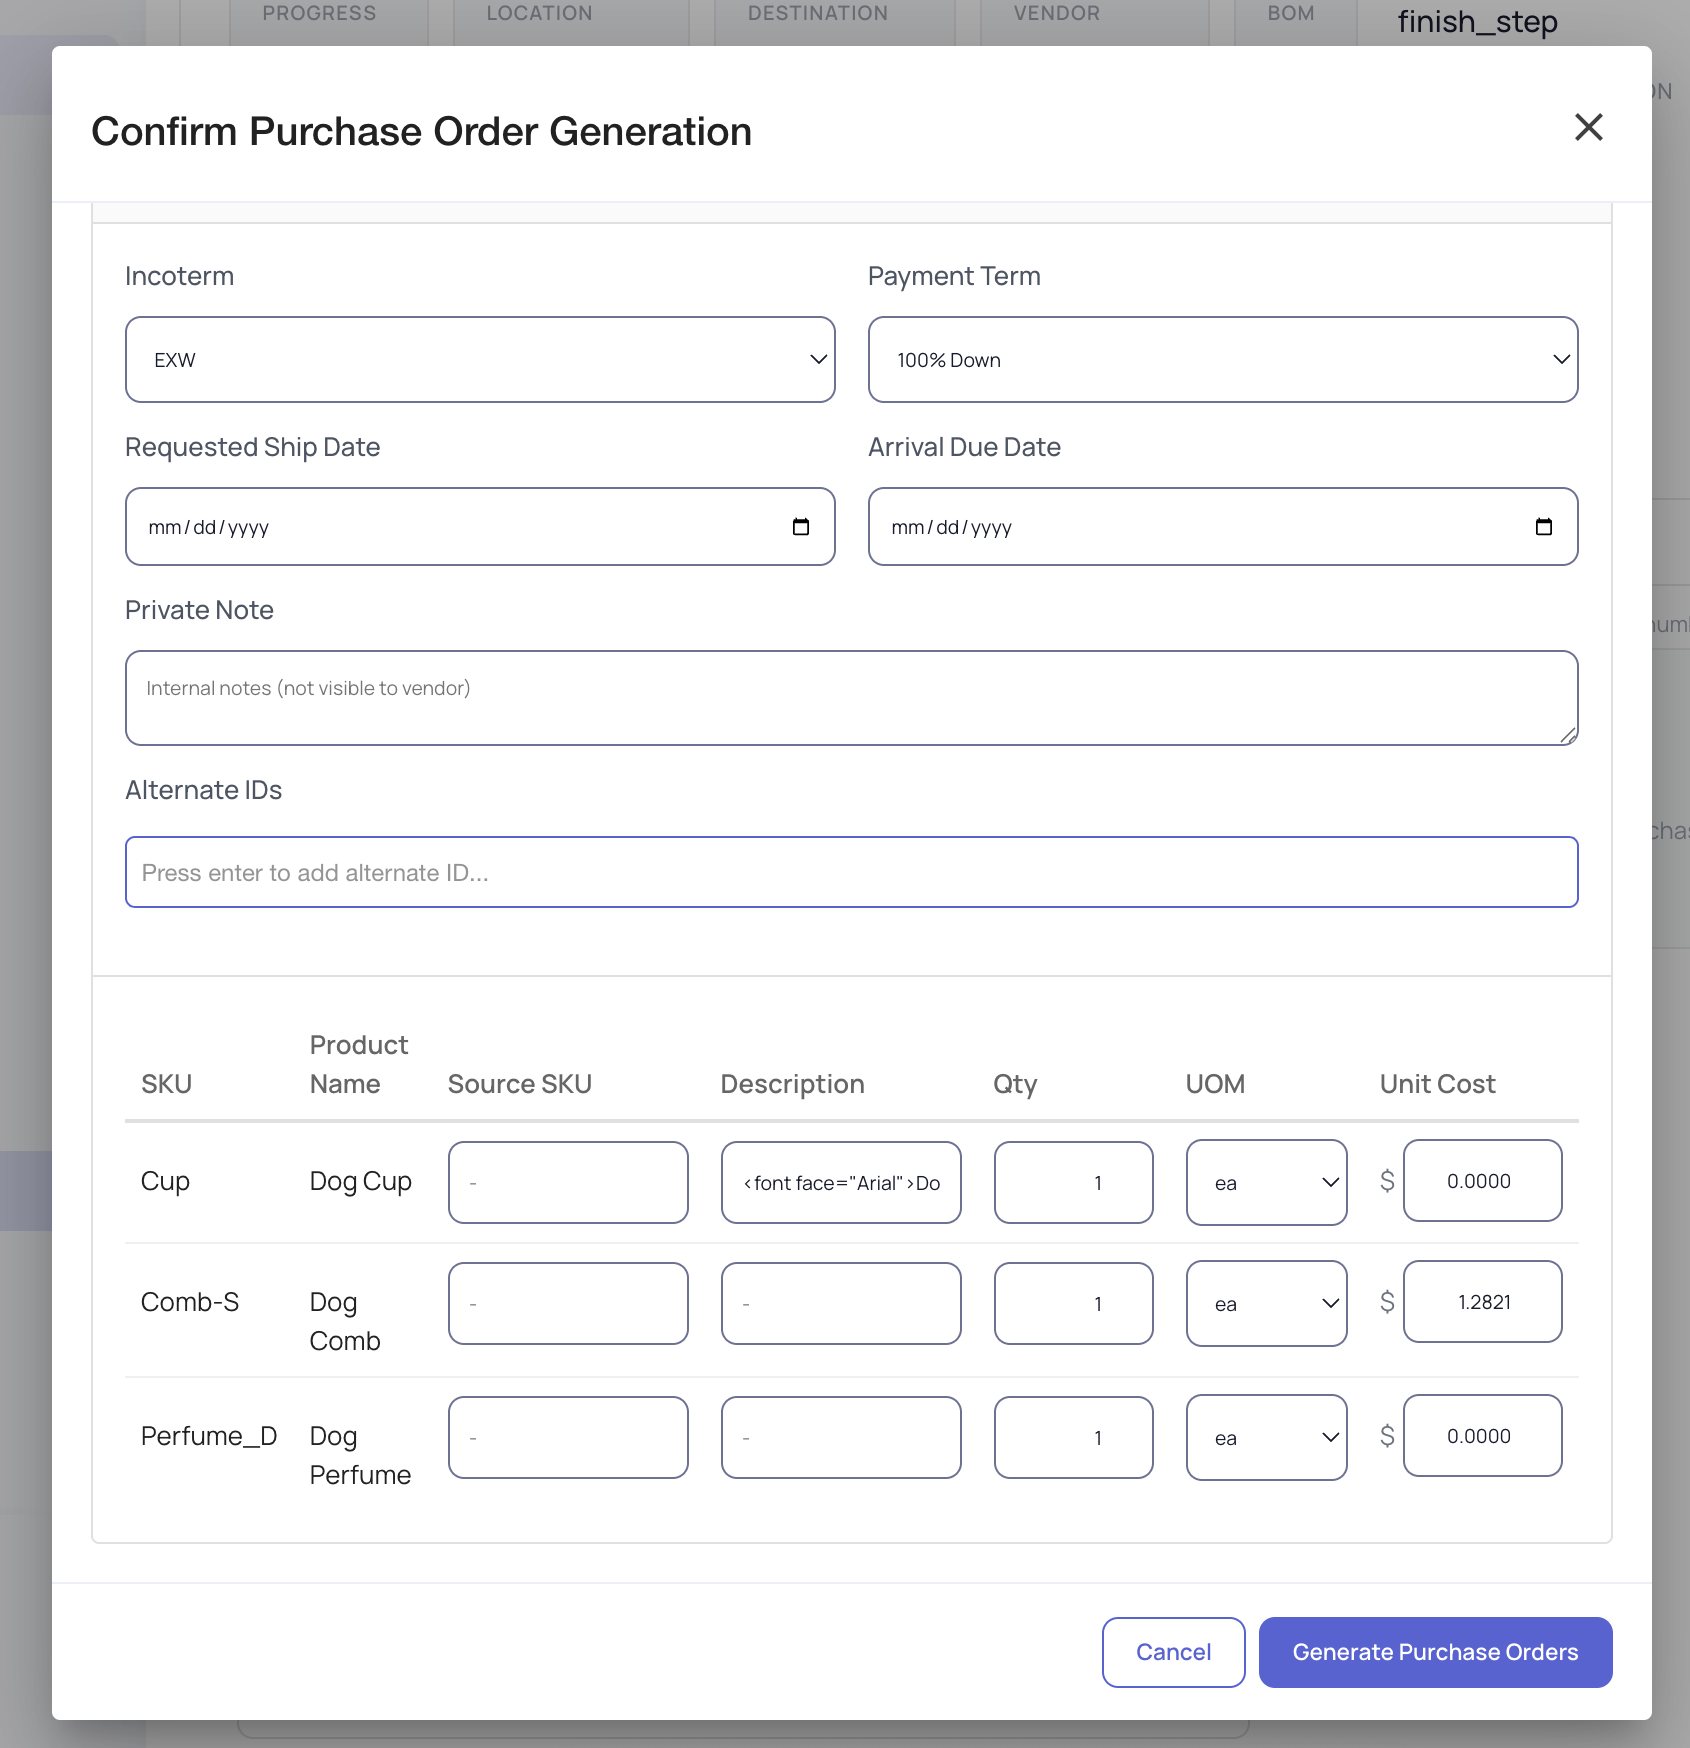
Once you fill out the Purchase Order / Transfer Order details, confirm your action by clicking the Generate button.
The system pre-populates each PO with the vendor's last purchase price, incoterms, and payment terms from their supplier profile — no manual re-entry required. All generated documents appear in the right-hand sidebar as clickable links.
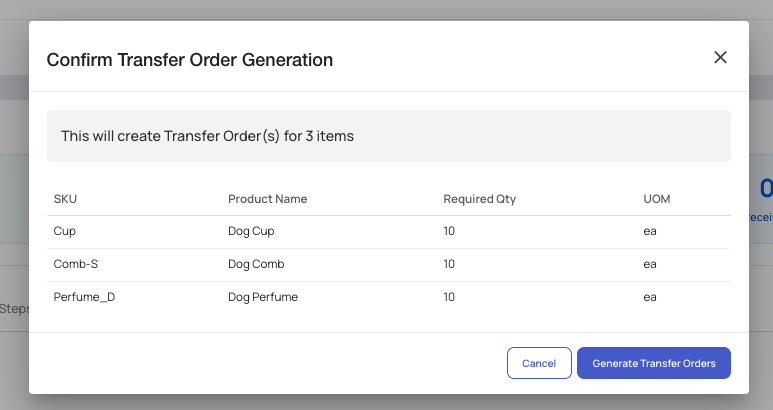
Tip: You can also link an existing PO to a work order component if the raw material is already on a draft or confirmed PO. This is useful when a single component is shared across multiple work orders.
Step 4 — Track Multi-Step (Layered) Production
Work Orders support multi-stage production workflows. Under Production & Logistics Steps, each step displays:
- The output SKU for that step
- Planned vs. completed quantity
- A progress bar
- The required components for that step
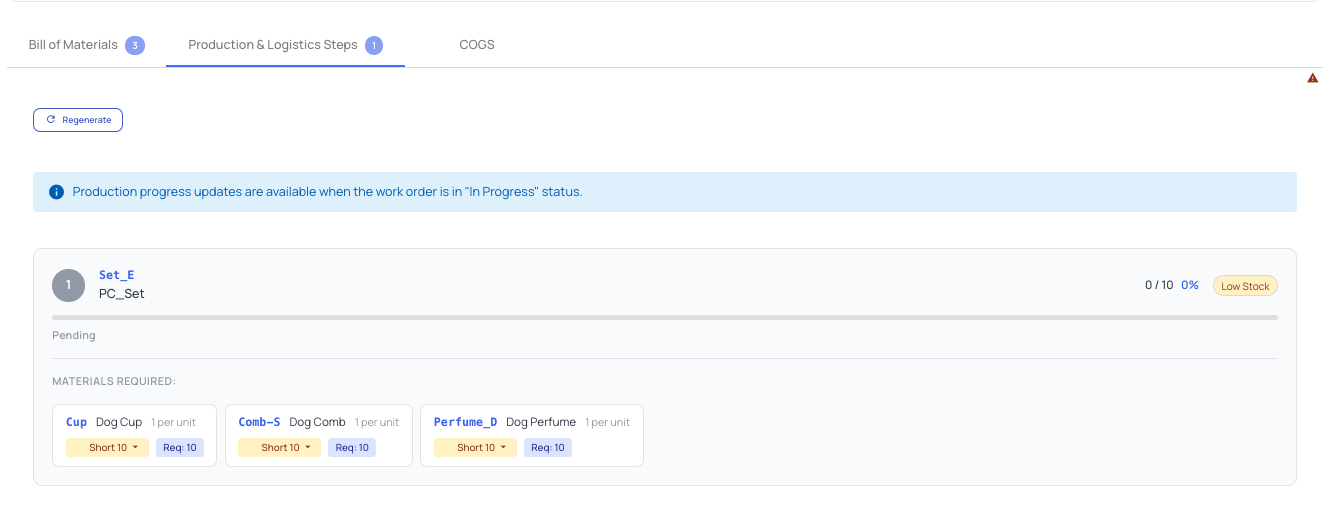
Example of a two-step workflow:
Step 1: Raw Materials → Subassembly Step 2: Subassembly + Packaging → Finished Product
Subassemblies are tracked separately in the sidebar, so you can manage intermediate goods and final goods independently. Over-producing intermediate goods for future production runs is fully supported — not all steps need to be 1:1.
Step 5 — Report Production
When the co-manufacturer completes a batch:
-
Go to Plan > Start
-
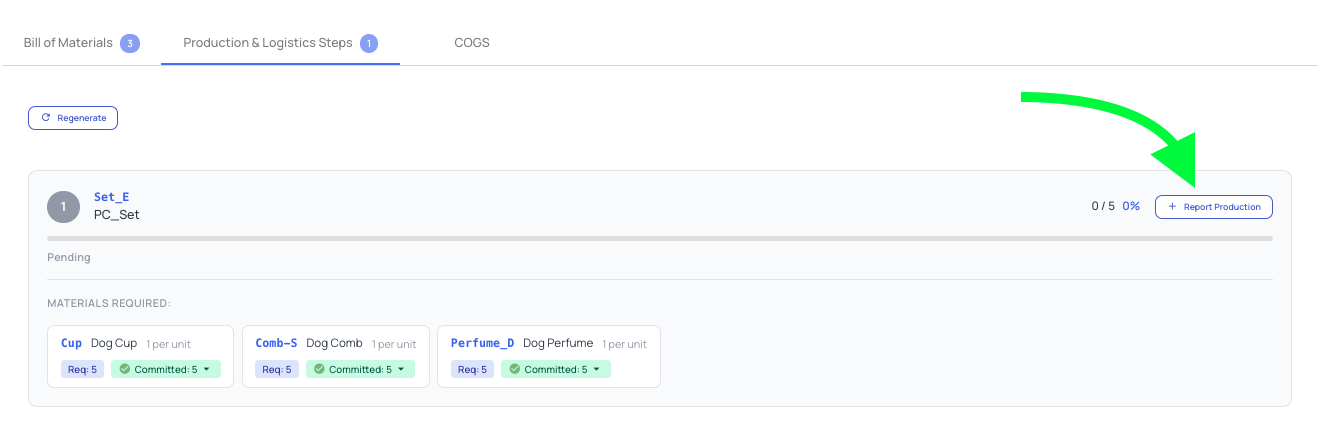
Scroll down to your Production & Logistics Steps and click Report Production.
-
Enter the quantity produced for that batch and select Complete Step.
The progress bar updates in real time. You can report production in partial batches, allowing you to track output before all finished goods have been received. The manufacturing service fee is automatically applied to COGS at this stage.
- Change the status of the Assembly Order to Complete to reflect on the "Produced" progress bar.
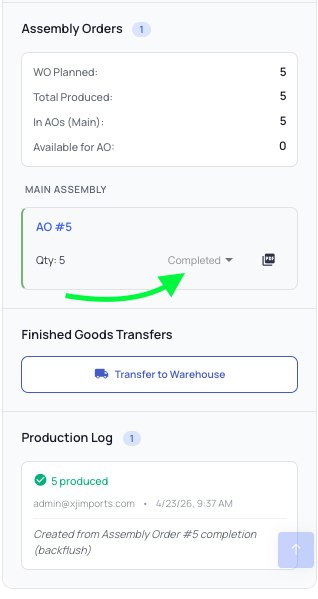
Receipt Options:
| Option | When to Use |
|---|---|
| Complete All Steps and Receive | Automatically completes all pending production steps in proportion to the quantity received, then records production entries. Recommended for standard multi-step workflows. |
| Immediate Receipt (Manual) | Completes only the final production step and skips subassembly steps. Use this when the co-manufacturer handles all internal subassembly and you only track the finished output. |
All receipts are logged in the Production Log in the sidebar, showing quantities, dates, and the user who recorded each entry — providing a complete audit trail.
Step 6 — Transfer Finished Goods to Your Final Warehouse
After production has been reported, transfer finished goods from the co-manufacturer's warehouse to your final destination (3PL, FBA, or internal DC) directly from the Work Order.
In the right sidebar of the work order, scroll to the Finished Goods Transfers section and click:
| Button | When It Appears |
|---|---|
| Transfer to Warehouse | No prior transfers exist on this work order |
| Transfer More | At least one transfer has already been created |
Note: The button only appears when Total Produced > 0. If the work order is still in Draft or no production has been reported yet, the Finished Goods Transfers section will be empty.
In the Transfer Finished Goods dialog:
- Review the Available Quantity at the top of the dialog. This is the maximum you can transfer and is calculated as: Available Quantity = Total Produced − sum of all Posted finished-goods transfers Cancelled and Voided transfers are added back to the balance automatically, so restoring a transfer's status also restores its quantity.
- Select the Destination Warehouse.
- Adjust the Transfer Quantity if you want to move less than the full available balance. The field is pre-filled with the Available Quantity.
- Choose a Transfer Order Status:
| Status | Effect |
|---|---|
| Posted | Transfer is active and immediately reduces the Available Quantity for any subsequent transfers |
| Draft | Transfer is saved but not yet committed; does not reduce Available Quantity until posted |
- Click Create Transfer Order.
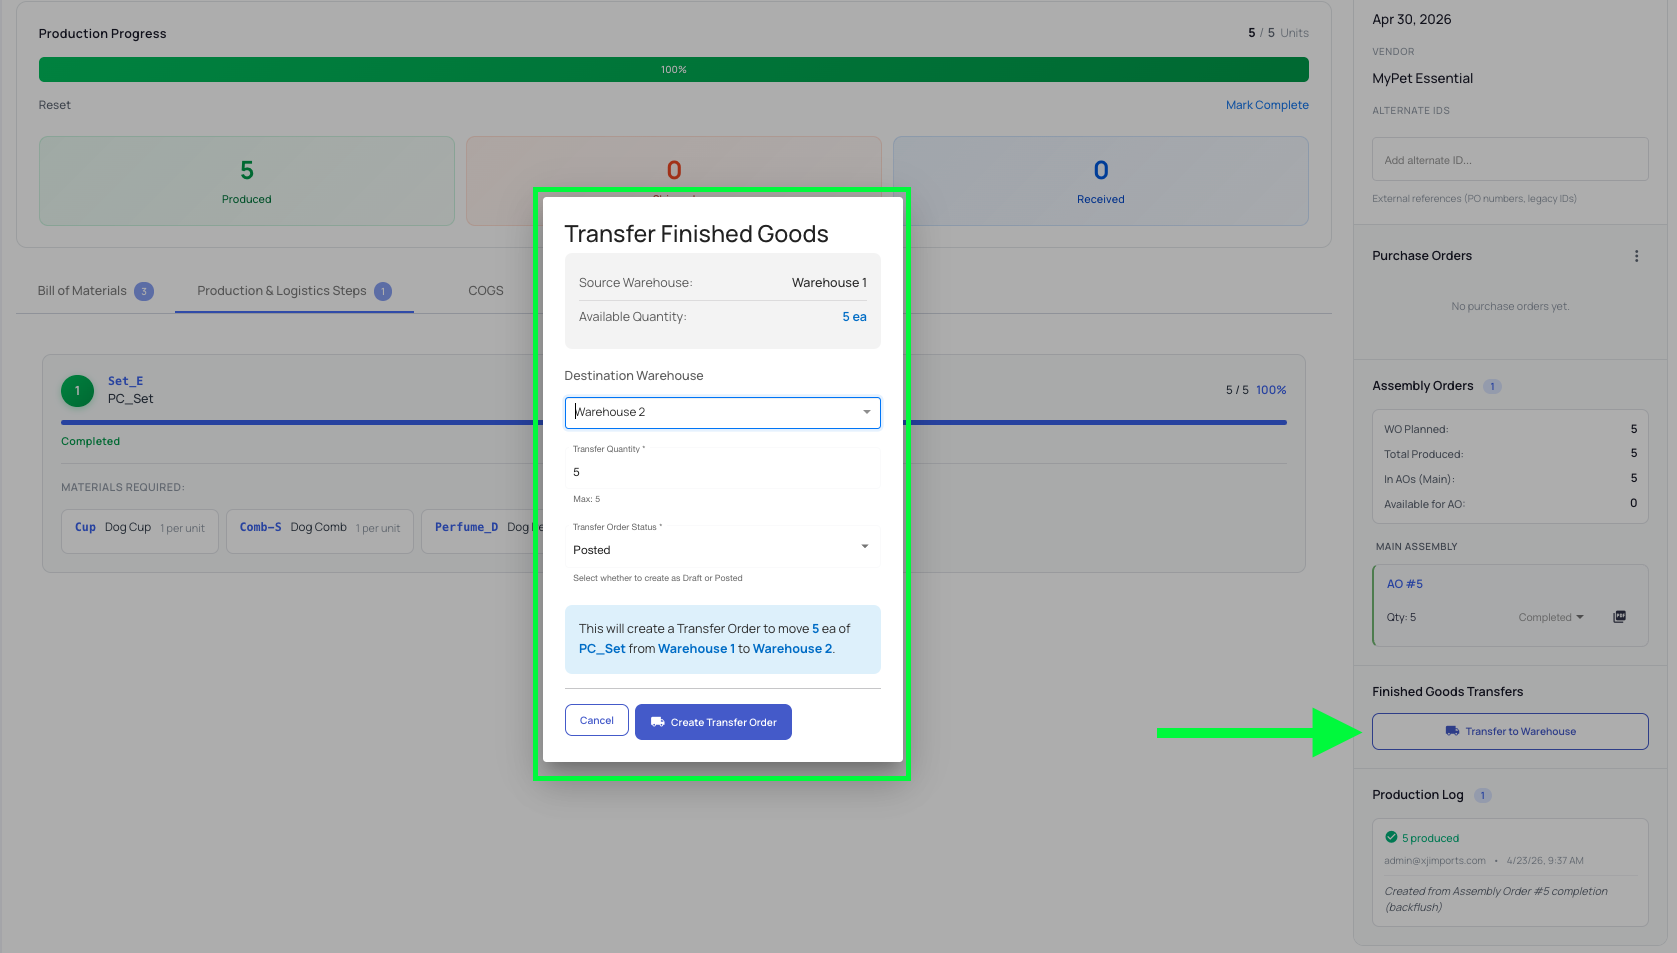
The sidebar refreshes automatically after each transfer. If you click Transfer More again, the Available Quantity in the new dialog will reflect the amount already moved — so you can transfer in batches without risk of over-transferring the same finished goods.
Inbound shipment reconciliation: If your account has active inbound shipments, navigate to the Transfer Order record directly to reconcile it against an existing inbound shipment. When reconciled, the receipt status updates automatically.
Tip: You can cross-check the Available Quantity shown in this dialog against Inventory → Work Orders → Shipment Planning at any time — both figures should match. If they don't, take a screenshot of both views and contact support.
Step 7 — Receive and Create a Receiving Report at the Final Warehouse
-
On the lower right side of the Work Order, click the Receive button. You will be redirected to the Receiving Report page.
-
Create the Receiving Report. Refer to Creating and Managing Receiving Reports for the full process.
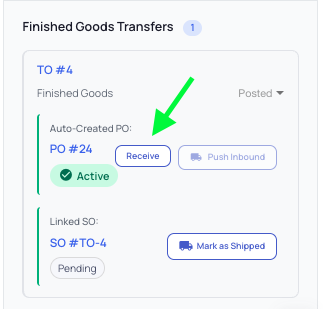
- The Purchase Order number will be automatically linked from the Work Order.
-
After submitting the Receiving Report, review the Production Progress on the Work Order — the status should indicate Received.

Production Runs (Batches)
Production Runs group multiple Work Orders together — for example, when you are producing several different SKUs in a single co-manufacturing run.
The Production Run view shows:
- All nested Work Orders and their individual statuses
- All associated Purchase Orders and Transfer Orders in one consolidated list
- Progress across every SKU in the run
The shipment planning tab includes all finished goods from across work orders in a run, allowing you to plan transfers to multiple destinations in one place.
To Create a Production Run:
- Navigate to: Inventory > Work Orders > Production Runs
- Click Create Run
- Fill out Production Run Information. Production Location, Destination Warehouse, and Co-Manufacturer are required fields.
- Under Work Orders, search and select SKUs to create work orders for this run. You may select these by material or by product.
- Once complete, select Create Run to finalize.
Coming soon: Shared Transfer Orders for batches — draft a single unified shipment covering all finished goods from a production run, rather than creating individual TOs per Work Order.
Custom Fields
Work Orders support custom fields, allowing your team to track additional data specific to your workflow. Common use cases include:
- QA or lab testing status
- Batch or lot numbers
- Regulatory or compliance flags
- Internal approval status
To configure custom fields, contact your Luminous implementation team or support.
Packing Slip Import (AI-Powered)
Luminous supports uploading a packing slip PDF directly to a Work Order. The system uses AI to extract the production quantity from the document and match it to the correct work order.
- Open the Work Order.
- Click Import Packing Slip (top-right of the work order) and select the packing slip PDF.
- The AI processes the document and displays the extracted data for your review.
- If a match is found, click Continue. Luminous will create an Assembly Order for the identified quantity.
- You can then complete the Assembly Order manually, or request auto-completion if stock is sufficient.
Note: If the packing slip data does not match any open work order, the system will display an error. Verify the work order number and SKU details on the packing slip before re-uploading.
Exporting Work Orders
Work Orders can be exported and sent directly to your co-manufacturer in place of a traditional purchase order.
- Click into the work order hyperlink you would like to export.
- Under Details, select Export to PDF.
Custom export templates are supported for branded documents. The PDF export includes all relevant production details and is formatted for external sharing. This replaces the need for a separate subcontract PO to communicate the production request to your co-manufacturer.
Tips & Best Practices
- Plan before committing stock. Use the Planned status to get all your POs and TOs in order before clicking Start. Once you move to In Progress, stock is committed and will be deducted from available inventory for other work orders sharing the same BOM components.
- Use bulk supply assignment first, then override exceptions. Use "Set All to Brand Supplied" or "Set All to Vendor Supplied" for speed, then manually adjust the components that differ.
- Link existing POs rather than always generating new ones. If a raw material is already on an open PO, link it to the work order component to avoid duplicate orders.
- Export the Work Order PDF to send to your co-manufacturer. This replaces the need to create a subcontract PO. The manufacturing service fee is captured separately in COGS at production time.
- Transfer finished goods directly from the Work Order sidebar. Using the Finished Goods Transfers section keeps all transfers linked to the work order and visible in one place — no need to navigate away to Inventory → Transfer Orders.
- Transfer in batches without worry. Each time you click Transfer More, the Available Quantity in the dialog reflects all prior posted transfers, so there is no risk of over-transferring the same goods across multiple sessions or users.
- For layered assemblies, review each production step carefully before reporting production to ensure the correct components are being consumed at each stage.
- Use Production Runs when running multiple SKUs with the same co-manufacturer in one window. This gives you a consolidated view of all activity and supports combined shipment planning.
- Reconcile transfers to inbound shipments when your 3PL or warehouse uses inbound shipments. This keeps receipt statuses accurate without manual updates.
FAQs & Troubleshooting
The shortage indicator is still red after I received a PO. Stock display refreshes automatically but there may be a brief delay. Try refreshing the page. If the issue persists, verify that the received PO was for the correct SKU and matches the warehouse location set as the production facility on the work order.
I don't see the Manufacturing Service Fee field. This field only appears after you select a Co-Manufacturer (Vendor) in Step 1. Make sure a vendor is selected before looking for this field.
My production quantities aren't updating after I report production. The "Produced" count updates only when the associated Assembly Order has been completed. Reporting production creates the AO — you still need to mark it complete for the quantity to reflect in the status bar.
Can I receive partial quantities of finished goods? Yes. Enter the partial quantity in the Receive Finished Product field. Use "Complete All Steps and Receive" to proportionally complete all production steps for that batch, or use "Immediate Receipt" to skip subassembly steps if your co-manufacturer handles them internally.
What happens to leftover intermediate goods after a multi-step work order? Leftover intermediate goods remain in inventory at their produced quantity. Work Orders do not automatically consume or write off unused subassemblies.
I don't see the Transfer to Warehouse or Transfer More button in the sidebar. The button only appears when Total Produced is greater than zero. Confirm that production has been reported and an Assembly Order has been completed before looking for the transfer option.
The Available Quantity in the Transfer Finished Goods dialog looks too high — it doesn't seem to account for a transfer I already created. Confirm that the prior transfer's status is Posted, not Draft. Draft transfers do not reduce the Available Quantity. If the transfer is posted and the number still looks off, close the dialog, reload the work order page, and open it again — this forces a fresh refresh of the transfer history.
I see a "Could not refresh transfer history" message when opening the dialog. This is typically a transient network issue. The dialog will still open using the last available data, but the Available Quantity may not reflect a very recent transfer. Close the dialog, reload the work order page, and try again. If the message persists, contact support to confirm the backend is reachable.
Can I transfer finished goods to more than one warehouse from the same work order? Yes. Create one transfer to the first destination, then click Transfer More to create a second transfer to a different warehouse. Each dialog will show the remaining Available Quantity after prior posted transfers.
Additional Help
If you run into issues not covered here, reach out to the Luminous support team for assistance.