Overview
You can manually create a sales order directly in Luminous from the Sales Order Grid page. The creation form is organized into five tabs — Addresses, Line Items, Advanced Settings, Notes, and Attachments — and opens as a dialog window.
Step 1: Navigate to Sales Orders
In the left navigation, go to Operations → Sales Order Grid.
Step 2: Open the Create Dialog
- On the Sales Orders page, click the Actions button in the top-right toolbar.
- In the dropdown menu, select Create Sales Order.
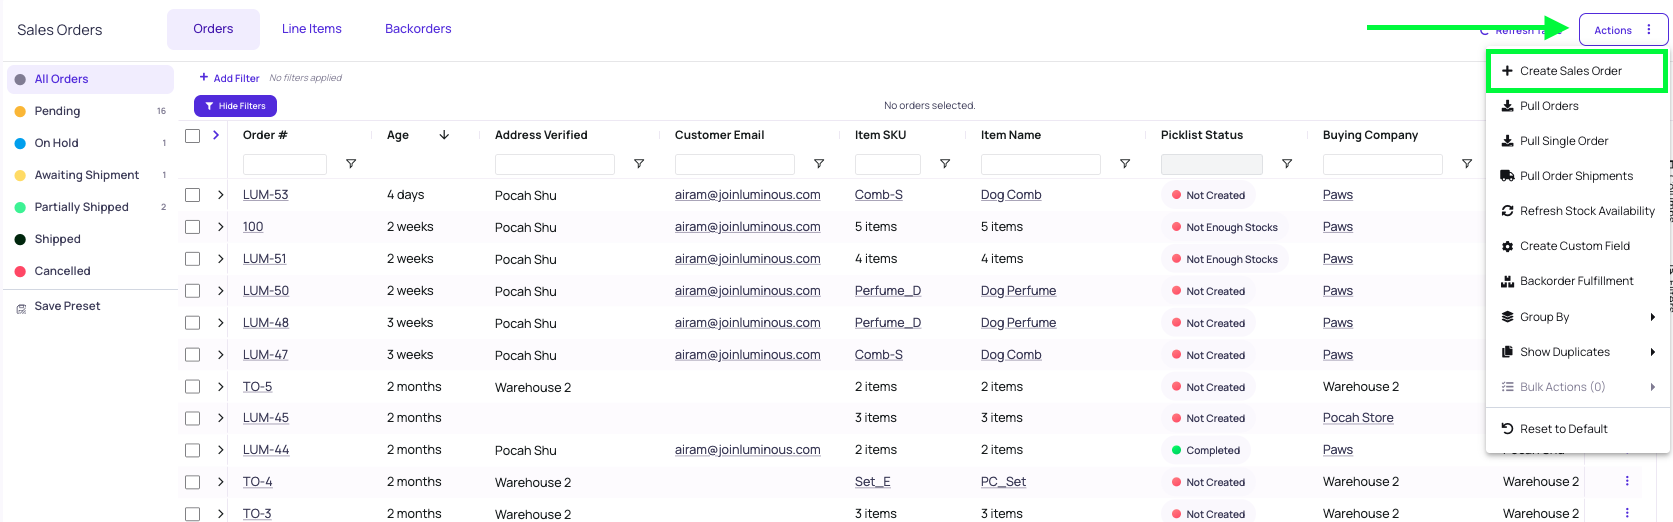
A dialog titled Create Sales Order will open.
Step 3: Fill In the Header Fields
At the top of the form, complete the order-level details:
| Field | Notes |
|---|---|
| Order Number | Leave blank to auto-generate, or type your own |
| Custom PO Number | Your customer's PO reference |
| Order Date | Defaults to today; change if needed |
| Ship By Date | The deadline for shipping this order |
| Channel | The sales channel this order belongs to |
Step 4: Addresses Tab
Enter contact and shipping details:
- Company — Search for an existing company, or click the link to create a new one. Once selected, the company's outstanding balance is shown.
- Name / Email / Phone — Contact information for this order.
- Ship To — Full shipping address (Address Lines 1–3, City, State, ZIP, Country). Also enter Carrier Code, Service Code, Package Code, Shipping Account #, Shipping Type, and Shipping Notes as needed.
- Bill To — Billing address. Check Same as shipping to copy the Ship To address automatically.
If the company has multiple saved shipping addresses, a Shipping Address dropdown will appear so you can choose the correct one.
Step 5: Line Items Tab
Add the products being ordered:
-
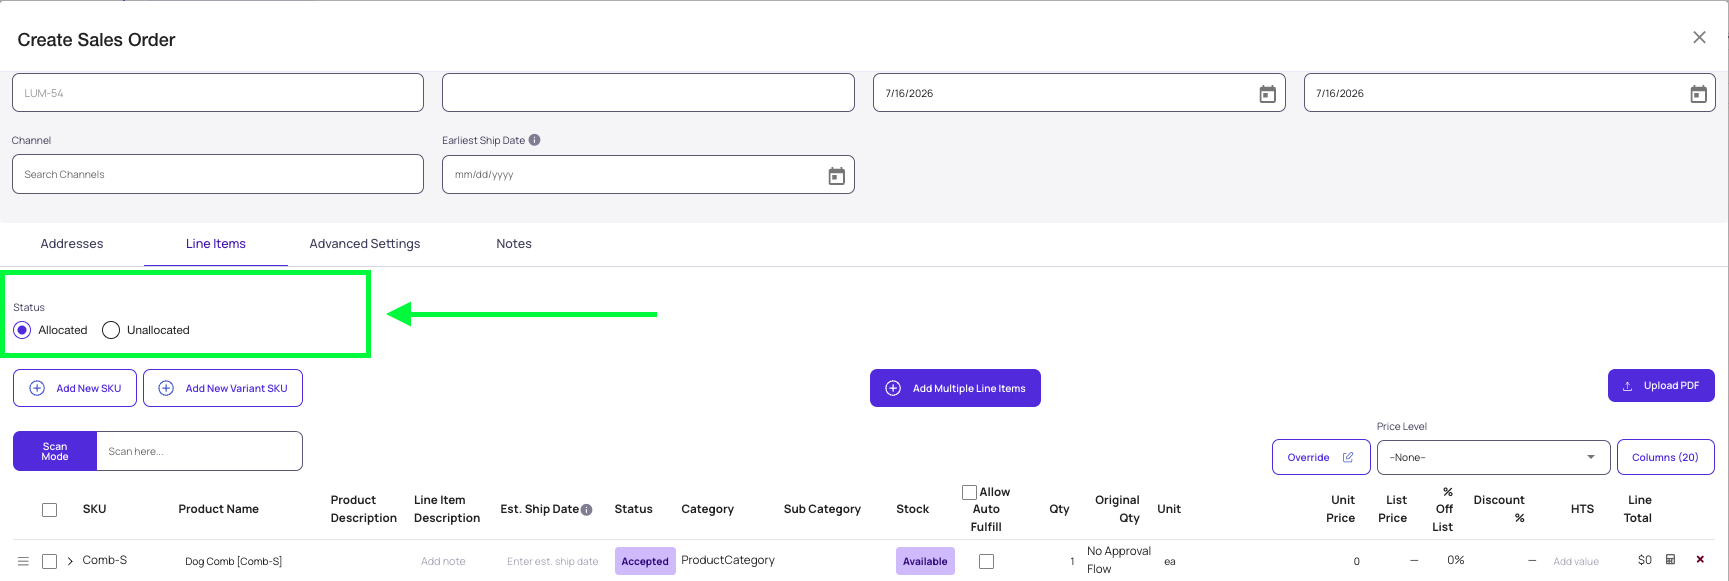
Status — Choose Allocated to immediately reserve inventory, or Unallocated to hold the order without reserving stock.
-
Earliest Ship Date — Optionally set the earliest date this order may ship (this field is in the order header at the top of the form, next to Channel).
-
Add products using any of these methods:
- Add New SKU — Search for and add a single SKU.
- Add New Variant SKU — Search for and add a variant SKU.
- Add Multiple Line Items — Opens a bulk item picker.
- Upload PDF — Upload a purchase order or order acknowledgement PDF to pre-fill line items automatically.
- Scan Mode — Use a barcode scanner to add items by scanning SKUs.
-
Optionally set a Price Level to apply B2B pricing, or click Override to manually set prices.
-
Fulfillment Priority List Override — Select a specific priority list to control which warehouse fulfills this order, instead of the system default.
-
Note: Editing Fulfillment Priority list override is only available after you save the Sales Order.
-
Click the Pencil Icon beside the Item name to set the fulfillment priority list override.

-
Step 6: Advanced Settings Tab (optional)
- Partial Order Fulfillment — Enable or disable partial shipments for this order, and set a minimum fulfillment threshold percentage if needed.
- Custom Fields — Fill in any order-level custom fields your team has configured.
Step 7: Notes Tab (optional)
- Customer-Facing Notes — These appear on documents sent to the customer (e.g., packing slips).
- Internal Notes — Private notes visible only to your team inside Luminous.
Step 8: Review the Order Summary and Save
At the bottom of the dialog you will see:
- Order Total — Sum of all line item amounts.
- Shipping — Enter any shipping charge to add to the order.
- Tax — Enter any tax amount.
- Discount — Enter any order-level discount.
- Net Total — Final calculated total.
When everything looks correct, click Save. The dialog will close and your new sales order will appear in the Sales Order Grid.
Tips
- If no line items have been added, the Save button may be disabled. Add at least one line item before saving.
- Orders created manually have the source set to Luminous, which means their line items can always be edited after creation.
- To create many orders at once, use Tools → Imports → Sales Orders to bulk-import sales orders from a file.